
Contents
Don't Fix It In The Mix
All About Microphones and Miking
How to Record Vocals
How to Mic a Drum Kit
Microphone Primer
Directional Response of Microphones
Frequency Response of Microphones
Transient Response of Microphones
Amplitude and Frequency
Phase Relationships
Phase and Mic Placement
Stereo Miking Techniques
Tracking Bass and Drums
Instrument Miking Techniques
Recording Piano
Recording Bass
How To Get A Great Bass Sound In Your Home Studio
Recording Bass DI
Recording Bass Situations
Live Sound Primer (or making lemonade)
Recording Vocals
Recording Horns
Recording Drums: The Foundation
Recording Drums: Choosing Microphones
Recording Drums: Microphone Placement
Recording Drums: EQ and Track Sheets
Recording Electric Bass
Advanced Drum Tuning
Balanced vs. Unbalanced Audio Connnections
Setting Up Gates and Compressors
Console EQ
Advanced EQ
Production Tips Part 1 (punch-in/out techniques)
Production Tips Part 2 (pitch shifting)
Project Diary Part 3 (some live recording)
Project Diary Part 10 (fixing some parts with Pro Tools and flying in background vocals)
Project Diary Part 11 (background vocal recording techniques)
Project Diary Part 12 (vocal production techniques)
Mixing Part 8 (drum mixing)
Mixing Part 9 (polishing a rough mix to perfection)
Mixing Part 10 (EQ and Compression)
Phantom Power Demystified
Recording the Voice
Advanced Dynamics
Inside a Session: Tracking
Frequency and Pitch
How To Get Great Drum Sounds From Your Home Studio
Practical Drum Kit Miking: Part 1
How to Record a Kick Drum
Three mics on a drum kit?
Guitar Miking: Getting a Great Guitar Sound
Equalization Artifiacts
Equalization Applications
by Zach Ziskin
One comment I often get from bands and artists I work with is how relatively quickly I am able to get mixes sounding great. I always tell them that mixing is easy when you're working with great sounds to begin with. A well worn cliche in the recording world is to 'fix it in the mix,' or gloss over inadequacies and mistakes during recording in favor of doing repair work during the mixing stage. Sure, it's possible to take mediocre sounding tracks, and with some 'massaging' and studio wizardry produce a cohesive and satisfying final mix, but the extra time and effort spent doing so is much better spent before the first note is played.
When I'm tracking a project, the first thing I do before I even go to the mic cabinet is spend some time checking out the instrument itself. One of the most common 'problem instruments' to get to sound good is a drum kit. Drum tuning is the single biggest reason drum tracks either sound great or awful. I never cease to be surprised by how many drummers don't have a clue how to properly tune their drums, or set them up for recording. Many drummers simply bring their kit into the studio with old, improperly tuned heads, cymbals set up a hair above their toms, and miscellaneous hardware creaks and squeaks. Fortunately, I know a drum tech who is available for session setups, and in a half hour has a formerly awful sounding kit ready for any recording.
When a drum kit is optimally tuned and set up, it almost doesn't matter what mics you use. I've worked many times with the same drummer who is a pro at tuning, and most of the time I simply end up throwing SM-57's on all his drums, including the kick, and with relatively little adjustment of the mic placement. The tracks sound amazing. If your drummer isn't well versed in tuning, I highly recommend budgeting the $75 or so to have a knowledgeable drummer or tech come in and tune up the kit. It will be money well spent.
Bass is another instrument that can be tricky if care isn't taken with the setup. The bass needs to anchor the low end and, along with the kick drum, form the bedrock that the rest of the tracks sit upon. The most common way to record bass is DI, or by plugging the bass directly into the console or computer. Whereas with drums it is preferable to use new heads, with bass I find new strings to be too bright and prone to excessive 'finger noise.' I prefer a bass that has strings that have been on and played for at least a couple of days. That way, the strings still have lots of punch and sustain, but don't have any of the buzz and noise. After all, you don't need the bass occupying any of the higher frequencies--you'll need those for your guitars, vocals, etc.
An important note regarding the bass--the sound of the bass should be listened to in conjunction with the drums. It's no use getting a great bass sound by itself that doesn't gel with the drums you've tracked. It's important to experiment with the tone knobs and/or pickup selections on the bass to find the tone that gels with the drums best. Even better is if you can borrow a couple of extra basses from some other bands or friends to audition during recording.
Electric guitar is especially crucial to get right before you break out the microphone. Since an SM-57 placed right in front of the amp's speaker is the norm for guitar recording (and has always worked great for me), the bulk of the tweaking takes place with the guitar itself, amp settings, and signal routing to the amp. To get good clean tones, make sure that the guitar you're using has been properly set up in terms of pickup height and string height. If the height of the individual strings is different over a pickup, some notes will sound loud and clear while others get lost. Again, for those who aren't well versed in guitar setups, a trip to a reputable guitar tech or luthier can do wonders for your sound.
Getting good distorted or overdriven guitar sounds requires more attention to the amplifier and pedals (if used). The key to good distorted sounds is compression, which you should look to get in one of two ways. If you are getting your distortion or overdrive from the amp itself, it's best to crank the volume up as much as possible, so that the output tubes begin to saturate (assuming you're using a tube amplifier--for those using solid state amps this doesn't apply). This will create a natural compression of the signal and balance the overall sound. If on the other hand you're using a pedal for your distorted tones, amp volume isn't as much of a consideration, as most distortion/overdrive pedals provide a healthy dose of compression to the signal. In fact, in these cases it may actually be preferable to record the amp at a relatively low volume. For instance, it is widely reported that the Edge from U2 records most of his tracks through small amps at low volumes, using various distortion pedals.
When it comes to recording acoustic guitars, again it all comes down to a great sounding source. Many cheaper acoustic guitars have low end 'bumps' that make for uneven and boomy patches when played and recorded. A well balanced acoustic guitar that is smooth from low end to high will record well with just about any decent condenser mic put in front of it. Some of the better names include Taylor, Gibson, and Martin.
One part of the recording discussion that needs to be addressed is the performances by the musicians themselves. You can have the best drum sound or bass setup, but it won't matter if the drummer's hitting is inconsistent and meter deficient, or the bassist is sloppy and overplays. Part of being a good engineer sometimes involves making suggestions to the musicians on how to best perform their parts (in the absence of a producer). By spending the extra time up front to make sure that the players' instruments and performances are as top notch as possible, you assure yourself of an easier time during mixing, and a professional sounding final product.
In future articles I will discuss specifics on tracking, from microphone selection and placement, to eq considerations and compression, as well as in depth discussions on mixing.
In my previous article I discussed the importance of working with the instruments themselves to maximize the sonic quality of the recordings. In the next two installments, we will discuss miking, including selection and placement, citing some of the microphones most commonly used in major recording sessions.
Assuming that the instrument or sound we are recording sounds the way we want it to when listening to it live in the room, the goal of proper miking is to get the microphone(s) to 'hear' it the same way and basically translate those sounds as faithfully as possible. The range of quality and cost of various microphones is almost endless, and which mics you choose (or are limited to by budget and availability) will determine how faithfully your sounds can be captured. For instance, if you put a $75 dynamic mic and a $3000 condenser mic in front of the same acoustic guitar, both will get the basic character and tone of the instrument. However, the $3000 mic will have a clarity and transparency to the sound and be well balanced throughout the EQ curve, while the $75 mic will have not translated certain frequencies and may sound one dimensional or boxy.
There are two major types of microphones--dynamic and condenser (there is a third major type called ribbon microphones, but they are so expensive that if you own these, you probably don't need to read an article on microphones! ;-)). Dynamic mics are rugged and don't require external power. These can be plugged directly into a console or line mixer and produce sound. Because of their sturdy and rugged nature, dynamic microphones are ideal for very loud sound sources such as close miked drums and guitar amplifiers. Condenser microphones are more delicate and require an external power source, commonly referred to as phantom power. Most modern mixers and consoles provide phantom power for the mic inputs in the form of a +48V button or switch. If you don't have one, you'll need an external mic preamp or power supply equipped with phantom power. Condensers have a wider frequency range and sensitivity than dynamic mics and are well suited for sources such as vocals, strings, acoustic guitars and room and ambient sounds. Within the categories of dynamic and condenser mics there are small diaphragm and large diaphragm microphone designs. Small diaphragm mics are smaller and pick up sound in a specific area, usually sounds that the mic is pointed directly at. Large diaphragm mics are larger and tend to pick up all sound in a general area.
Aside from vocals, I prefer not to EQ or compress any tracks as they're being recorded to disk or tape. I will spend whatever time I need tweaking mic position or changing mic selection to get the EQ in the ballpark of where I want it for a track. Sometimes I will very lightly compress a kick and snare drum to optimize levels during recording if the drummer is inconsistent, but otherwise I simply run the mics into mic preamps and directly to disk/tape.
Before discussing particular miking techniques, one tool that I highly suggest you use is a great pair of headphones. The better ones cost upwards of $150 or $200, but will give you a very good reference when experimenting with mic placement out in the recording room. Ideally you will be able to plug the mic(s) into the console, turn up the volume and listen in the room to the source with the headphones and move the mics around until it sounds great in the phones. This won't be as useful when doing loud sources like drums and loud guitar amps, but works wonders when miking acoustic guitar, strings, piano and non percussive instruments.
Drums are one of the most complex instruments to mic since there are several mics, usually with dynamics on the fast, percussive parts of the kit (i.e. the drums themselves) and condensers on the ringing parts (the cymbals), and all interact together to produce an overall kit sound. Let's start with the kick. There are two common ways to mic the kick, the first being a dynamic mic inside or near the opening of the front head. As I described in the previous article, if the drummer has tuned his drums well and they sound great already, you shouldn't have much trouble getting a good sound. You might need to experiment with the angle of the mic and how far into the drum shell it is. The second method is to use two mics on the kick, one inside the kick as already described and a condenser mic a few feet in front of the kick drum. Using some heavy blankets and chairs, form a sound 'tunnel' from the kick to the condenser mic to help isolate the sound from the rest of the kit. The two mics are mixed together to form one kick drum sound. I only recommend going this route if you're having particular trouble getting a good kick sound with just the one mic inside the kick drum. Some of the common mics used on kicks include AKG D-112, Shure SM-57, and my personal favorite is a Shure Beta 91, a relatively new mic (and a condenser), but amazing in its ability to just drop inside a kick drum and instantly sound great.
Toms are miked usually with dynamic mics, most commonly Shure SM-57's or Sennheiser 421's positioned 2-3" over the top head of the drum. Again, while some tweaking of mic position may be necessary, well tuned toms should sound great with the mics in a general position over them. Snare drum is usually also miked with a Shure SM-57, but can be trickier, since snare mics will commonly pick up bleed from the hi hat. There are a couple of techniques to help minimize this. First is to position the mic so that it is pointed away from the hi hat and in the direction of the floor tom. Angle it slightly down toward the top of the snare. The second technique, which can be used in conjunction with the mic position, is to mount a 'mini gobo' on a mic stand and position in between the snare and hi hat, effectively isolating the snare mic. I use a 5" x 7" piece of drywall covered with carpet for this purpose.
The hi hat will usually be miked with a small diaphragm condenser pointed at an angle toward the outside of the hat. If the mic you use has a high pass filter on it, it's probably a good idea to put it on, as you won't need any low end on the hi hat. Some common condenser mics used on hi hat are Shure SM-81, AKG 451 and 414 and Neumann KM 184.
The overheads, along with the kick drum represent in my opinion the most important mics for the drum kit. In fact, if I were given only three tracks for drums, these would be the three mics that I would set up. Well placed overhead mics can make up more than 70 percent of the overall drum sound, with the other drum tracks used to provide extra definition and impact to the individual drums. The overhead mics should be placed well above the whole kit, usually anywhere from 3 to 5 feet above the kit. There are a couple of ways to position the overhead mics. The first, which will be the route you'll go if using large diaphragm mics, is to place one mic over each side of the kit, pointing down and slightly away from each other and toward the cymbals. Here is a little secret that will help your positioning to maximize the sound of the snare in the overheads. Measure the distance from the center of the snare to the capsule of the left overhead mic, and then match the distance to the capsule of the right overhead mic. This will also solve many phase problems associated with stereo mic setups. Commonly used large diaphragm mics for overheads include Neumann U87's, Audio Technica 4050's and AKG 414's.
The second method for overheads involves using small diaphragm condenser mics in what's known as an X-Y configuration. Both mics are positioned in the same location above the drum kit, but criss crossed so that each is pointing down to the opposite side of the kit. This provides a very wide stereo image, often wider than the first overhead technique. Small diaphragm condensers could also be used with the first overhead technique, but produce better results for the overall kit sound in an X-Y setup. Commonly used mics for this setup include Neumann KM 184's, Shure SM-81's, and Audix makes some great new mics in its SCX series.
Finally for drums, and optionally based upon the number of tracks you have available, are room mics. These can be great to add natural ambience and reverb to a drum sound, or get that massive 'John Bonham' sound. If you have a decent live sounding room, setting up a pair of large diaphragm condensers at human ear level anywhere up to 20 feet away from the kit can give you another dimension to the drum tracks. Mic choices for room tracks are often the same as those listed for overheads.
In part two of the discussion on miking we'll cover other commonly recorded instruments, including guitars, bass, voice, piano, horns and strings.
Now that we've discussed the various types of microphones and their uses, let's continue with descriptions of the commonly recorded instruments, how to mic them and commonly used mics, and in this installment I have some audio samples to aid in the discussion.
In the last article I described miking drums. Here is a raw audio sample of a drum kit I recently recorded. The snare and toms were miked with Shure SM-57's, the kick with an AKG D-112, the hi hat with an Audio Technica 4033 and the overheads with Shure SM-81's in an X-Y pattern. There was no compression or EQ used on any of the mics going to disk, and I didn't even end up moving any of the mics after I placed them. Hopefully this will help drive home the point that above all else, the actual sound of the instrument you're recording will determine how good your tracks sound.
We'll begin this month's discussion with acoustic guitar, which moreso than most instruments will vary in its sound by moving the microphone even a fraction of an inch. Acoustic guitars have a wide range of EQ at the various locations on the instrument. In front of the soundhole, the guitar sounds boomy. Toward the bridge is mellower and thinner. The best overall spot for most applications is where the neck meets the body of the guitar, where it's not too boomy and has good top end. In almost every miking situation for acoustic guitar you'll want to use a condenser mic, preferably with a large diaphragm to capture all the transients and high end definition. If the mic has a high pass filter, switch it in, as it will filter out a lot of undesirable low end boominess and rumble. If using just one mic on the acoustic, place it somewhere between 5-12" away from the guitar pointed at the neck/body joint. Again, as previously mentioned, listening with a pair of quality headphones while placing the mic will help, as moving the mic just fractionally will change the sound and EQ, and you can hear the changes as you do them.
Another option for acoustic guitar if you have it is to use two mics on the guitar, one placed as described and the second another foot or two behind the first mic pointed at the guitar. With just the first mic, you'll get a very tight, 'in your face' sound. The second more distant mic will give you more ambiance and 'space' to the sound. By blending the two mics together either to tape or recording both and blending in the mix, you'll get a more natural sound with a little more air to it. Click here to hear an acoustic guitar I recorded with just one mic, and here to listen to the same guitar with two mics. For those interested, the guitar was a Taylor 310CE close miked with an Audio Technica 4033 and distant miked with an Oktava large diaphragm condenser. Common choices for recording acoustic guitar include Neumann large diaphragm condensers such as the 103, 87, etc., AKG 414, and Audio Technica large diaphragm condensers.
When it comes to electric guitar, the standard has been and still is a dynamic mic close miked on an amp. While there can be some variance in the EQ by tweaking the mic position off center of the speaker cone, for the most part the sound and quality of the track will be determined by how good the amp and guitar sound by themselves. Some engineers also like to distant mic an amp and blend the two mics as described with the acoustic guitar, and some engineers who have access to high end ribbon mics will use them on amps to great effect. I personally have found that I can get most of the sounds I want with the one close mic and by tweaking the amp and effects. Commonly used dynamics include Shure SM57 and Sennheiser 421.
Piano is a fairly easy instrument to mic as long as you have a well set up and tuned piano to work with. For the purposes of this discussion we'll deal with miking a grand piano (or baby grand). Piano is most commonly recorded in stereo with two mics, one capturing the upper musical range and the other the lower, and with the piano lid propped open. For those who haven't seen what the inside of a grand piano looks like, here's a picture. As you can see, there are two groups of strings that criss cross in different directions. The group of strings on the left are for the low keys and the ones on the right are the high keys. So a common way to mic the piano is to place a condenser mic (I've seen both large and small diaphragms used here) 8-10" above the upper strings (the right side in the picture) closer to the keyboard end of the piano. The second mic (usually a large diaphragm condenser) is placed above the lower strings toward the back of the piano. The first mic track is panned hard right and the second hard left, so that as the player plays from the low notes to the highs, the sound moves across the stereo field from left to right. I rarely use any EQ or compression when recording the piano, as good condenser mics on a well balanced piano should produce a great sound by itself. Commonly used condensers include the usual suspects, the Neumann's, the Audio Technicas, and the AKG's.
Vocals are pretty straightforward to record--you set up the mic, stick the singer in front of it and go, right? Well, sort of. This is the one place where you can't just try different instruments if you don't like the timbre and sound, after all that would mean getting a different singer! Therefore, more than any other instrument, having a selection of mics to choose from is essential. Some singers have a very cutting, midrangey quality, where a smooth mic such as a Neumann U87 would work great. Others singers are very full and booming, where a more transparent and top end emphasized mic like an Audio Technica 4033 could be called for. This is also the one area of tracking where I will use a compressor going to tape/disk, as most singers can be very dynamic volume-wise. Again, the standard selection of mics for recording vocals comes from the large diaphragm condenser family.
Strings and horns are lots of fun to record, simply because you don't get to work with them as often as other commonly recorded instruments, and because listening to the sound of good string and horn players is so wonderful. With strings, how large a string section you're working with and what kind of string sound you want will dictate how to mic them. If you're recording a full 18 piece string section and are going for a lush 'pad' type of sound, you can probably get all that you need from 4 room overhead mics placed several feet above the players. If recording a smaller ensemble such as a quartet, you'll probably want to individually mic the players with condenser mics. Individually miking will also give you a much more up front and intimate sound, where you'll be able to hear the horsehairs of the bows drawing across the strings (check out the Beatles' 'Yesterday' or 'Eleanor Rigby' for examples of this). For cellists, usually a large diaphragm condenser mic placed several inches in front of the cello pointing toward the 'F' holes or bridge will produce a nice sound. For viola and violin, either a small or large diaphragm condenser placed a foot or so above the instrument pointing down toward the F holes works well. Click here to listen to a recent string session I did with one violinist and cellist double tracked to sound like a quartet. The cello was miked with an Audio Technica 4033 and the violin with a Neumann TLM 103 through mic preamps straight to disk.
Horns, including saxophones, trumpets, trombones, and french horns can be miked with either dynamic or condenser microphones as horns tend to be quite loud and provide plenty of volume for the mics to handle. If using dynamic mics, such as Sennheiser 421's or 441's, you can position the mics closer to the bell of the horn for a tighter, more up front sound. With condensers, you should keep them anywhere from 6-12" away from the bell so they don't get overloaded, and in fact you may still need to switch in a pad on the mic if it has one. Again the common choices for horn condenser mics include AKG 414, Neumann U47, U87 and TLM series, and Audio Technica's AT series.
If you've noticed many of the same mics popping up in this discussion from one miking application to another, it's no coincidence. High quality microphones are usually well suited for many applications. The great news for semi-pro and home recordists is that prices continue to come down for great mics, and newer, high quality mics are coming to market for less and less money. To wrap up this discussion on microphones and miking, I'll recap a few mics I consider to be some of the best, most versatile and affordable microphones, both condenser and dynamic that any engineer should consider having in their arsenal and current price ranges they can be found for on ebay as of this writing:
($200-250)- Amazing large diaphragm mic for the price. At these prices, get two for stereo applications.
[Shure SM57?] ($60-75)- The industry standard mic for snare drums, toms and guitar amps.
Sennheiser 421 ($200-300)- High end dynamic mic commonly used on drums, horns and guitar amps.
($520-600)- Any Neumann is a good Neumann, and this model is one of their most affordable high quality large diaphragm condenser mics around.
($550-600)- A longtime industry standard for everything from acoustic guitars to horns to vocals and more.
($200-250) -Great small diaphragm condenser mic for drum overheads, hi hat, strings, and piano.
Of course there are plenty of other amazing affordable mics on the market today, and your needs and budget will dictate your selections. Happy recording!
Difficulty Level: Easy Time Required: 30 minutes
Here's How:
Tips:
Related Features:
Difficulty Level: Easy Time Required: 30 minutes
Here's How:
Difficulty Level: moderate Time Required: under 1 hour
Here's How:
Tips:
Related Features:
A microphone is a transducer. It changes one kind of energy into another. As a comparison, the human body has two transducers: the ears and the voice box. What you need to know about microphones can be broken down into the following word: TRAP. Each letter of 'TRAP' stands for a mic attribute or a fact that you should know about mics in general.
T -- Type - Studio mics
break down into two basic types. Dynamic and Condenser. Dynamic mics work
on the principle of magnetic induction. They need no external power to run
and are very simple to make and relatively cheap to buy. Dynamic mics come
in two varieties: Moving coil and Ribbon. Moving coil mics use a magnet,
a coil wrapped with wire and a diaphragm that sits over the top of both.
Sound pressure hits the diaphragm and moves the coil across the magnet.
This creates the voltage that travels out and along the mic cable on the
way to the mic
pre-amp. A ribbon mic is a bit different. Instead of a coil and diaphragm,
a thin metal corrugated ribbon is stretched across the magnetic field. Sound
pressure hits the ribbon and moves it across the magnet. Both these mics
have their own particular characteristics dealing with frequency
and transient
response.
Condenser mics are generally more expensive and have a flatter frequency
response than dynamic mics. They also operate in an entirely different fashion.
For one thing, these mics need power to run. This is called phantom
power and is +48Vdc. Phantom power comes down the mic cable from the
console, a battery inside the mic or standalone power pack. The phantom
power charges a capacitor which holds a charge in the mics' fixed backplate.
In front of the backplate resides a thin diaphragm. When the diaphragm moves
in relation to the fixed backplate, a charge is developed in relation to
how much movement the diaphragm makes. Unlike the signal created by the
dynamic mic, a condenser's signal is very weak and must be amplified before
it gets to the console. In order to do this the mic contains a small amplifier
that boosts the signal before it leaves the mic.
R-- Recognition - To run a session successfully in a studio environment that may have an extensive collection, you need to know your tools. Just as a plumber or a carpenter could tell you what their tools are. To accomplish this, you must study mics in general, ask questions and do a lot of reading on the subject. This site has extensive info, including quizzes about mics. Use the search engine at the top of any page on my site or the feature index to find more information.
A -- Application - What mic is good for what job? Do you know the best mic for recording kick drum? How about vocals or horns? Once again, study is the key. Do your homework and you'll soon have a bag of tricks that will serve you well in the studio.
P -- Patterns - The directional response of a mic has to do with how the mic picks up sound around it's polar axis. The front of a mic is called on-axis, all other directions into the mic are called off-axis. When you talk about the on-axis and off-axis response, you are talking about how a mic picks up sound in reference to those directions. There are five basic polar patterns that mics offer. Omni, Cardioid, Hyper-cardioid, Super-cardioid and Figure eight. Read the next few features for further explanations on these patterns and how they effect what you're recording. (18.3.1997)
Every mic, by design, has a pattern in which it picks up sound. This is called the mics directional response. This response is represented in one dimension using a polar pattern diagram like the drawings below. However, in actuality the mic picks up sound in 360 degrees. There are five basic patterns that we will discuss here, some common and some not so common.
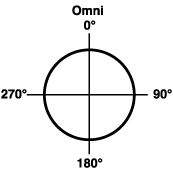 One of the most
common patterns is Omni. Think of this like a giant beach ball with the
mic placed at the center. The mic picks up sound in a 360 degree arc. As
you can see in the drawing, 0° (on-axis) and 180°,270°,and 90°
(off-axis) pick up sound equally. When placed properly in pairs, mics with
this pattern present a very real representation of stereo. Other patterns
in pairs can present sometimes negative characteristics involving phase
and what's called proximity effect. Omnis do not have these problems(phase
and other waveform properties will be discussed in an upcoming feature).
One of the most
common patterns is Omni. Think of this like a giant beach ball with the
mic placed at the center. The mic picks up sound in a 360 degree arc. As
you can see in the drawing, 0° (on-axis) and 180°,270°,and 90°
(off-axis) pick up sound equally. When placed properly in pairs, mics with
this pattern present a very real representation of stereo. Other patterns
in pairs can present sometimes negative characteristics involving phase
and what's called proximity effect. Omnis do not have these problems(phase
and other waveform properties will be discussed in an upcoming feature).
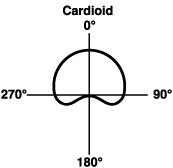 The next pattern is called cardioid. You can see where it got its
name because it is in the shape of a heart. The drawing shows that on-axis
response is full and as you come around the side to the back of the mic,
response (volume) is diminished. This pattern is said to be uni-directional
or directional. It works best in a situation where you want the off axis
signal to be diminished. For instance, when you're miking a snare drum or
toms on a drum kit you'd want to downplay the off-axis signal which would
be the cymbals, hi-hat etc.
The next pattern is called cardioid. You can see where it got its
name because it is in the shape of a heart. The drawing shows that on-axis
response is full and as you come around the side to the back of the mic,
response (volume) is diminished. This pattern is said to be uni-directional
or directional. It works best in a situation where you want the off axis
signal to be diminished. For instance, when you're miking a snare drum or
toms on a drum kit you'd want to downplay the off-axis signal which would
be the cymbals, hi-hat etc.
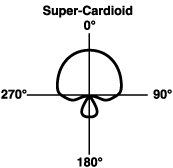 Cardioid now
slowly morphs into bi-directional with two stops along the way. Super-cardioid,
as you can see, is very much like cardioid with a few changes. The front
lobe starts becoming more directional. In other words it shrinks at the
sides. This pattern also starts developing a small back lobe so it is letting
in a little bit of sound off-axis.
Cardioid now
slowly morphs into bi-directional with two stops along the way. Super-cardioid,
as you can see, is very much like cardioid with a few changes. The front
lobe starts becoming more directional. In other words it shrinks at the
sides. This pattern also starts developing a small back lobe so it is letting
in a little bit of sound off-axis.
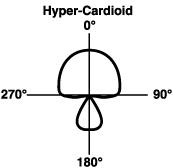 Hyper-cardioid
is the above and more so. The front lobe becomes even more directional and
you can see that the back lobe is even more pronounced. This pattern would
be good for a situation where you want the mic to be more directional and
also want to pick up more of the environment that you're recording in. For
instance, when recording a choir in a nice concert hall you could 'aim'
the mics at the choir and also get some of the nice off-axis signal that
would bring in the sound from the rear of the mic. Keep in mind, Hyper-
and Super-cardioid let in less off-axis from the sides of the mic so they
are great stage mics for live applications.
Hyper-cardioid
is the above and more so. The front lobe becomes even more directional and
you can see that the back lobe is even more pronounced. This pattern would
be good for a situation where you want the mic to be more directional and
also want to pick up more of the environment that you're recording in. For
instance, when recording a choir in a nice concert hall you could 'aim'
the mics at the choir and also get some of the nice off-axis signal that
would bring in the sound from the rear of the mic. Keep in mind, Hyper-
and Super-cardioid let in less off-axis from the sides of the mic so they
are great stage mics for live applications.
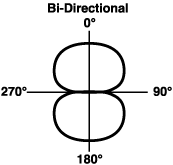 Last stop is
bi-directional or figure 8 pattern. This pattern picks up equally well on-
and off-axis and cancels at 90° and 270°. You could, for instance
have two vocalists, one at either axis and pick them both up equally well.
Don't confuse this pattern with a stereo mic. The signal still comes out
of the mic in mono, you're just able to pick up the sound in a figure 8
pattern. Bi-directional is limited in it's usage, 90% percent of the time
omni and cardioid will be your patterns of choice. As you'll see in future
features, this mic can be used effectively in a M-S
miking application.
Last stop is
bi-directional or figure 8 pattern. This pattern picks up equally well on-
and off-axis and cancels at 90° and 270°. You could, for instance
have two vocalists, one at either axis and pick them both up equally well.
Don't confuse this pattern with a stereo mic. The signal still comes out
of the mic in mono, you're just able to pick up the sound in a figure 8
pattern. Bi-directional is limited in it's usage, 90% percent of the time
omni and cardioid will be your patterns of choice. As you'll see in future
features, this mic can be used effectively in a M-S
miking application.
Some mics have fixed patterns; dynamic mics are always fixed for instance. Condensers sometimes have the ability to switch patterns. As we will find out in future features (say THAT ten times!), these patterns each have their own specific situations where they excel. Stay tuned for more info that can improve your recordings. (25.3.1997)
A frequency response chart tells you what a microphone puts out as opposed to what it gets in and can give you some valuable clues for targeting its usage. It is simply a visual representation of what parts of the mic's bandwidth is boosted, cut or not there at all.
How Is It Measured?
Frequency response charts are generated at the factory by testing the mics in an anechoic chamber. This is a specially constructed room just for audio testing. The room is completely dead, without any sound reflection. A speaker is set up in front of the mic that is being tested and pink noise is played (pink noise is all frequencies with equal energy in every octave). The mic is routed into a spectrum analyzer that measures the output. A frequency response chart is produced from this, usually over the 20 Hz to 20 kHz range which is the range of human hearing. Like any manufacturing process, no two mics are exactly the same; you can even get an occasional lemon. This chart helps the manufacturer keep quality control high and lets them match two mics for sale as a pair. As engineers, we can look at the frequency response chart and get a ballpark estimate as to what the mic's all about. In a perfect world, a flat frequency response is the golden mean. In other words if the mic is putting out exactly what it gets in then that's great! However, last time I checked, this world isn't perfect and all mics have some kind of variance from the zero line. This shows up as dips and peaks on the frequency response chart. These peaks (called bumps) and valleys are not spikes but gradual rises and falls. Condenser mics usually stray little from the zero line, whereas dynamic mics response can look like a mountain range .
The Real Difference
A lot of factors determine what makes up a microphone's frequency response, for the most part you can think of condensers as being more true to life than dynamics. This also accounts for the great price difference in the two mics. You can get a brand new dynamic for under $100, whereas a decent condenser starts at around $400 and then the sky's the limit. For instance, a refurbished U-47 tube mic can be as much as $7,000! Does this mean that a dynamic is not desirable at all? No way! There are many applications where you'd prefer to use a dynamic mic. For instance, dynamics can take more level in general and great for use in high SPL (sound pressure level) situations. Close miking of drums for instance.
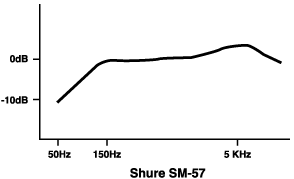
Let's take a workhorse mic like the Shure SM-57 and use it as an example. Look at the frequency response chart (this is a re-draw and not from the manufacturer so it's not gospel, just meant to be an estimation). You can see that at 50Hz the mic is down -10dB. It then gradually rises to zero level at about 150Hz. After that it's flat until you get to the 4KHz to 6KHz where you have a bump that rises and settles down and then the mic drops off at the high end. Definitely not a true representation of what's going on in the real world. However, this is a good thing! First off, this mic has a cardioid directional response. (See the polar patterns explained in previous features.) This means that the mic would be directional and would cancel from the back. In addition the mic is built like a rock and is cheap to buy. Looking better all the time. The frequency response makes it especially good for snare drum because the fundamental frequency of the snare resides in the 150Hz to 250Hz range, right where the mic is flat. The presence bump at 5kHz is just where the snap of the snare resides. In addition, it's rolled off low end makes it great for de-accentuating the kick drum which is very close in proximity. Lastly, the cardioid pattern makes it naturally reject the off-axis hi-hat, cymbals and toms. A match made in heaven! That's why this mic has been around for a long time and will continue to be so. At the other end, this mic would be a bad choice for miking a kick drum because of the lack of low frequency return.
A mic's frequency response chart can tell you a lot about where to use or not use a mic. We will refer to this in upcoming features and mic reviews. Stay tuned for more info along our road to better and better recording. (1.4.1997)
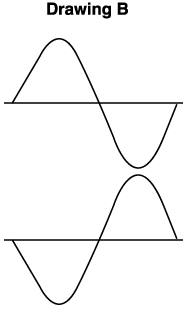
A transient is a short duration, high level peak, such as a hand-clap or snare drum hit. How a microphone reacts to a transient will directly effect its frequency response and how much SPL (sound pressure level) it can take. The transient response of a condenser mic, for instance, is quite accurate and quick. The design of the mic makes it very sensitive and mostly flat across a broad range of frequencies (depending on the mic of course). The diaphragm is able to snap back to a neutral position quickly and thus is ready to be hit by a new wave and react to it accurately. This is called the impulse response time. You can see in the drawing A that the transient response of a condenser mic gives you the full peak and the valley on the positive and negative side of the center line. Because of this accurate representation of the positive and negative transient, a condenser mic's headroom is quickly used up. There is a price paid for a mic that gives back most of what it gets in. The price is that it can't take a lot of SPL.
On the other hand if you look at drawing B, you see that the dynamic mics response is a bit different. It doesn't give you the full positive or negative wave. The wave is a bit clipped off at the top and bottom. Thus the headroom is not used up as quickly and as a general rule, dynamic mics can take more level than condensers. The third drawing, drawing C, shows you the transient response of a ribbon mic (also in the dynamic family). This mic gives back even less than a moving coil dynamic microphone. You can see that the positive wave has a crew-cut and the bottom or negative part of the wave is almost non-existent. This is because ribbon mics use a thin corrugated piece of metal rather than a diaphragm and a coil like it's brother. The ribbon is very thin and is only anchored at top and bottom. When a wave hits the ribbon, it goes through a lot of motion before it comes to rest. This gives ribbon mics their characteristic rounded off or smoothed out sound. Ribbons have made a recent comeback since Steve Albini used a Coles 4038 for recording the guitars on the multi-platinum effort he produced with Nirvana. The guitar sound is smooth, yet cutting and sounds great.
![]()
One exception to the idea that condensers can't take as much level as a dynamic mic is the Earthworks line of fixed omni condenser mics. These mics use an extremely small diaphragm. This results in an extremely quick impulse response time and an extended frequency response that is mostly flat up to 40k. They can also take almost nuclear sound pressure levels.
For more info on mics and preamps, visit my Subject pages on that topic. (8.4.1997)
Before we get into the specifics of mic placement and a lot of what might be foreign looking gear and situations, I think it's a good idea to lay some groundwork. These next features will deal with the basic properties of sound and how it works in our environment, which is air. These properties are not just book terms or boring edu-babble, but practical everyday things that you'll come across time and time again. Things like polarity, phase and how sound changes over time (called the envelope). We'll be tying in each concept with a real life application. So hang in there. If you're way ahead of me on this check back in a few weeks and we'll be covering the more advanced topics. Also, I just got my hands on three different mics from Equitek. The E-100, E-200 and E-300. I've never used these mics so I'm going to give them the complete once over. It will probably be featured in mid-May or so. Keep your eyes here for great stuff!
We will concentrate on two properties of sound this week. In order to study sound in one dimension we will use the drawing of a simple sine wave. A sine wave is like the tone you hear in the Emergency Broadcast System alerts. It is a pure tone with no overtones. Drawing A is a sine wave.
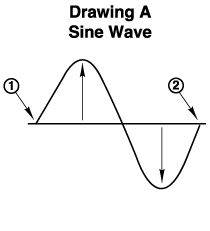
Amplitude
The first property of a soundwave we're going to cover is amplitude. It has to do with the distance above and below the centerline of the soundwave. The center line is the horizontal line in the drawings above, it is zero degrees. The vertical arrows in Drawing A denote amplitude. Simply stated, the larger the distance above and below the line the louder the sound. I always remember that this has to do with volume by keying in on the word AMP in amplitude. If you were a sound editor or were doing some digital editing on a DAW (digital audio workstation), you'd be dealing with an amplitude display such as this every day. The displays of most workstations show the recorded sound as a left and right complex soundwave. The left and right waves (denoting stereo) sit inside two rectangular boxes, one on top of the other. As the sound plays, the display will scroll horizontally and you will see the overall volume of the complex wave as very tightly compacted vertical lines. If the line exceeds the box it causes distortion. The display of the amplitude of the wave can tell you right away if you've exceeded the headroom of the system.
Frequency
The second property is frequency. It is measured in Hertz and has to do with how many cycles per second the wave goes through. One cycle is when the wave goes up, down through the line and back up again to the starting point. The beginning and end of a cycle is shown by numbers 1 and 2 in the drawing. This measurement can be taken anywhere in the wave as long is it ends up where it started. The numbers of times this happens in one second is the frequency of the wave. The more cycles per second the higher the sound. So frequency has to do with pitch. Every musical note, for instance, has a related hertz value. You see frequency represented on recording consoles and a lot of outboard gear. For instance, in the EQ section of some consoles you are able to sweep a band of frequencies to choose which one you want to boost or cut. Knowing how certain frequencies affect the sound of an instrument can make it easier to EQ that instrument and change its personality. This in turn can help you fit those sounds better into a mix and make it stand out more, or not. For instance, 20Hz to 100Hz provides bottom, 100Hz to 200Hz warmth, 500Hz to 1500Hz definition, 1500Hz to 4KHz Articulation, 4KHz to 10KHz Brightness and 10KHz to 20KHz air. As an engineer, frequencies are the paints you use on the canvas of sound.
Next week we cover more properties of sound and how they relate to real-life situations. Be healthy and enjoy life! (15.4.1997)
Phase has to do with the relationship of one soundwave to another. Two weeks ago (see previous feature 04/15/97), we discovered what amplitude and a cycle of a wave is. To quickly re-cap, a wave's cycle runs either above or below the centerline, then comes back through that line and loops back again to the starting point. The wave ends up traveling 360 degrees as pictured below:
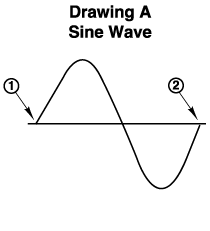
If two waves have a completely opposite phase relationship, as in the
next drawing, they are said to be 180 degrees out of phase, or simply, polarity
shifted.
If the waves are equal in frequency and amplitude and 180 degrees out of phase, they will completely cancel out and the end result will be 0dB. You know from simple math that when you add equal negative and positive numbers you end up with zero. This is exactly what's happening with out of phase sounds. For every positive excursion of the wave there is an equal and opposite negative excursion. The sum of these two adds up to zero. In addition, waves can meet each other at varying degrees out of phase, 60 degrees or 100 degrees for instance. In that case, instead of canceling out, the waves will boost some frequencies and cut some others. Little Labs makes a slick product to fix this kind of problem, but it's best to use proper mic placement in the first place to keep this from happening.
Phase Trickery
Because phase relationships are always at play in the real world, they can be incorporated into products used to get rid of unwanted sound. Think back to the last time you heard a helicopter traffic report. What was missing? The sound of the helicopter was missing. If you've ever been inside a helicopter you know that it's extremely loud, too loud to carry on a conversation without yelling. Now you've got a traffic reporter with a headset mic on and he's talking in a normal tone of voice and you're understanding every word and just hearing a gentle whirring in the background. How do they do it? They use the properties of phase to help. There is some complex math and processing going on but basically, you take the headset mic, which is picking up the voice of the pilot and the ambient noise of the copter. This is fed it into a mixer which is also receiving a feed from a second mic somewhere in the cockpit. This second mic is just picking up the ambient noise in the cockpit. If you flip the polarity of one of these signals then sum them together, what do you have left? Of course, the voice is the only thing remaining because it's the only part of the sound that's not common to both mics. The ambient noise cancels and the voice doesn't; very slick. Of course there are some other things added to the equation to make this work. Powerful real-time adaptive filters are needed to constantly track the interference then account for the difference in the interference picked up by the cockpit mic and the interference picked up by the wanted signal mic.
The Good, the Bad and the (out of phase) Ugly
While out of phase signals in the previous example is a good thing and useful, out of phase signals in the studio are something that are not desirable. Not to say it can't be used creatively, but in general it's something to avoid. As an engineer, you should know, by ear, what an out of phase signal sounds like. In mono, the effect of two stereo signals being out of phase is drastic and undeniable. Whatever signals are shared by both speakers in a two channel system, like your home stereo, will disappear. Sometimes completely and sometimes not but it will sound 'wrong.' In stereo the effect is not as drastic but with a few repetitions you can hear the difference. You will hear the following things in a stereo signal that is out of phase.
To clarify, by center image I mean the effect of what's called the 'phantom image.' When you sit between the speakers, whatever is shared by both speakers, is heard in the center (that is on a system that's in the proper polarity alignment). When that same system is out of phase, that center image is gone and the sound seems to come from around the side of your head. When I say 'absense of low frequency,' I mean the things in the mix that occupy the lower end, like Kick drum, bass guitar etc. When low frequency is absent, the signal sounds very 'thin.'
Absolute and Relative Phase
If you don't have a console at home that will allow you to flip polarity, you can do a little experiment that will allow you to put your speakers out of phase and hear the effects I'm speaking of. Simply go behind one of your speakers and switch the wires from positive to negative and negative to positive. This will put one speaker out of phase and also your system. Then sit between the speakers and listen to your favorite CD. Then flip the speaker back again and compare. Notice the difference? Putting both speakers out of phase is called being Absolutely out of phase and it will sound normal to your ear. This is because both speakers are out of phase and have nothing to relate to. The other way, where only one speaker is out of phase, is called being relatively out of phase.
Because of the complexity of this week's topic, we're going to break it up into two features. Next week we'll talk about how you can stay out of phase trouble when miking anything in stereo. (29.4.1997)
When you are miking an instrument in stereo (that is, with two mics) there is a possibility that the mics could be "seeing" the signal in different phases of the wave. This is because of the location of each mic in relation to the cycle of the soundwave. This can happen when the mics are different distances from the source. For instance, if you are miking a sound source with one mic up close and the other a bit back in the room, so you can pick up some of the ambience, there is a chance that the mics might be out-of-phase with each other. See Drawing A:
As you can see, one mic is seeing the wave at a peak and the other at a trough, these mics would be 180 degrees out of phase to each other. To fix this you'd simply have to move one of the mics up or back until you heard that the signal was in phase.
Checking For Polarity
Finding out if your stereo signal is in good shape is an easy matter. A signal out of phase will have an absence of low end, sound very thin or even sound like it's coming from around the side of your head.The best way to troubleshoot this is to put the console output into mono by either pushing the mono button or simply panning the two channels up the center. Bring the volume of the two mics up at equal levels and then flip one or other of the mics out of phase using the phase button on the console. You should hear a marked change in the sound (for the worse) as you flip the polarity. If your home system does not have it you can wire a cable out of phase and put it somewhere in line with one of the mics. Although a bit cumbersome it is the same thing as pushing a phase button. In reality, the mics can be at any degree of "out-of-phaseness".
To wire a balanced connector out of phase, you simply swap pins two and three (XLR) or the tip and the ring (TRS) at one end of the cable. If you are looking for a phase button on a console or on a piece of outboard gear, it is usually represented by the following symbol:

The Three to One Rule
To place two microphones in a good phase relationship you can follow what is known as the Three-to-One rule. This rule states that for every unit of distance away from the sound source, your mics should be at least three units apart. For instance, if your mics are six inches away from the source then they should be eighteen inches apart. If they're 1 foot from the source they should be three feet apart. This will keep you in good shape when close miking instruments in stereo.
Hot Tip: A polarity switch will just correct signals that are 180 degrees out of phase. To correct signals at other degrees out-of-phase to each other, Little Labs makes an excellent tool called the IBP. (6.5.1997)
ORTF and X-Y
Last feature we talked about the 3-to-1 rule. This week we'll explore ORTF, spaced omni's and the x-y techniques of mic placement. A major consideration when miking in stereo is phase coherence. This means capturing the sound wave in the same part of the cycle in both microphones. There are specific miking techniques that will help you with this, one being the 3-to-1 technique. Another is called ORTF. This is an acronym for a French phrase that escapes me now, but the technique is this. Place the mics 17cm apart and angled at 110 degrees. If you do this with your fingers you'll see that it's supposed to simulate your head and how our ears are situated. Not a bad scheme to steal from mother nature! There are manufactured attachments that can sit right on a mic stand that will let you attach mics exactly in this configuration, or you could do it yourself. This technique works best with non-omni patterned mics. Omnis present their own specific problems that must be dealt with differently. Also, ORTF is best suited for small capsule mics. Large capsule condenser's off axis response is poor because of the capsule geometry. Because of this, if you use them in ORTF the undesirable off axis is pointing right at the center of what you're recording. Also, remember that when using ORTF, the more you spread the mics, the less focused your stereo image becomes. Turning the mics out exposes more of the sound source to the off axis side of the mic which shrinks and weakens your stereo image. Not spreading them as widely puts the source more on axis to both mics.
Omni patterned and large condenser mics work best when placed in spaced pairs. How far apart you space the pairs depends on what you're recording. Omni overheads on a drum kit, for instance, could be 3 to 4 feet apart. A large choir might take a 6 to 10 foot spacing. The best thing to do is to experiment a bit and listen to what you're getting.
Our last pattern this week is called x-y. This is simulating the x-y axes on a graph. The capsules of the mics are placed in very close proximity and pointed at or around a 90 degree angle (also called a coincident pair.) This placement eliminates phase problems because the wave hits both mikes at the same time. This placement doesn't work very well with omni mics: Although it's true that omnis become more directional above 1k, think of the omni pattern as two huge beach balls with the capsule of the mics at the center. If you put the two balls together it just makes one big ball and you have. Using the ideas and techniques in this feature can help you capture the best of what goes on in any recording situation. (13.5.1997)
Assignment: Cut 14 songs for a CD. This includes recording bass and drums and then overdubbing sax afterwards. All this had to be accomplished over a span of one and a half days.
We had the studio locked out from 6pm on Monday until 10pm the following evening. So needless to say time was tight and we had to work fast. We worked at Mad Hatter in Los Angeles. I can't say enough about how great the studio was. Great equipment, staff and facilities. The console was a beautiful Neve 8078 with GML automation. They treated us like kings from beginning to end. Mark the studio manager went out of his way to accommodate us and Darren my assistant was top notch. We also got a killer rate as there seems to be a price war going on in LA.
I had some special problems to deal with in pre-production for this project. The basic layout of the group was to be piano, bass and drums. The problem was that the piano player had been involved in a car accident and had injured his hands. He couldn't play for more than an hour at a time. So he recorded his performances on a midi piano into a sequencer. Then we recorded the performances onto 2-inch analog using a Yamaha Disklavier piano. Along with this I put down two different kinds of click so that the other players would have a choice. All this was done prior to our tracking date. We brought 5 reels of 2-inch along with us to the studio.
What Mics to Use?
Now onto the microphone choices for the session. The bass was taken direct using a Neve 1073 mic preamp, then to an LA-2A compressor and then straight to tape. As for the drums, it was a 6-piece drum kit with two snares, one was a piccolo. I used a D-112 on the kick, both snares got SM-57s, toms I used 414s, hi-hat a Shoeps and the overheads were two C-12s in a cardioid pattern, placed as a spaced pair. I took all the mics through the board except the overheads I used a couple of the outboard1073s that were available. Later for the sax I used a Neumman U-67 through a 1073 straight to tape. This combination of mics and mic preamps produced some of the best tracks that I've ever cut.
Overview
So to re-cap the miking scenario. I close mic'd all the drums except for the overheads. The toms and snares were miked at an angle about 2 inches off the surface of the drum. The kick mic was about six inches back from the beater head on the inside of the drum. The overheads were spaced about 4 feet apart and were about 2-3 feet off the tops of the cymbals. The hi-hat was angled and was pointed at the drummer from the outside. The sax mic's position varied as to the horn used. Soprano was between the bell and the lower third of the horn about a foot back. Tenor and alto was pointed back a foot and just above the bell but not facing directly into it. This is because the sound of the sax doesn't really come from the bell but from the keys as well. So it's kind of a general coverage scenario.
Keep your eyes here for more miking tips and a week from now a review of three Equitek mics. (20.5.1997)
So many instruments, so many mics and so many possible ways to set up a mic. This is indeed the truth but it need not overwhelm you. Using some simple rules like 3-to-1 and x/y technique you can cover a majority of the instruments on the planet. No matter which technique you use, it's important to find an instrument's sweet spot. That is the area best suited for picking up the best possible sound. For instance, an acoustic guitar's sweet spot is NOT directly in front of the sound hole. That spot is where the instrument is most boomy and doesn't lend itself to great recording. In the next few features we are going to cover very specific techniques for specific instruments, such as piano and bass.
Decisions, Decisions
Right out of the starting gate you should ask yourself if you're going to want to record the instrument in mono or stereo. Some instruments lend themselves to this and some don't. Things you'll possibly want to record in stereo are: acoustic piano, acoustic guitar (works great in mono too), some percussion (congas, bongos, misc. toys), background vocals (either by miking a large ensemble in stereo or by panning of individual mono passes), and drum kits (utilizing overhead mics and panning of individual drums). Things you won't want in stereo are: lead vocals, solo horns and woodwinds, bass guitar and individual percussion (shaker, tambourine etc.). If mono is your choice, then mic placement is a simple matter of finding the best spot and distance to pick up the instrument. Below is a list of instruments with general guidelines for miking them.
Mono Instrument Miking Technique
Acoustic guitar (mono) - Place the mic between the sound hole and the bottom of the neck, four to six inches in front of the instrument.
Trumpet - Place the mic four to six feet from the bell in front of the horn. This works well with multiple trumpets. It allows the players themselves to get a blend and play as an ensemble.
Saxophone - The sound of the sax does not come solely from the bell but from the keys and the bell. For tenor and alto place the mic four to six inches above the bell pointing at the top of the upper ring of the bell and keys (about a 40 degree angle). For soprano sax the mic should be at a slight angle and pointing at a combination of the bell and the keys.
Percussion - Tambourine should be miked four to six feet back depending on the sound of the room. What you're trying to go for is an ambient sound that gives you some space. Individual percussion like shakers and triangles can be miked a few feet back from the player.
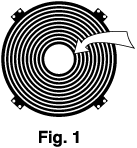
Speakers - I've found that speakers have a sweet spot up close and that is where the dust cover meets the cone. See Fig. 1. If you're going for a more open and ambient sound, move the mic back four to eight feet depending on your needs. In this case the mic can be pointed in the general direction of the speaker and the above guideline does not apply.
 (3.6.1997)
I was recently in Los Angeles working on an ongoing jazz project at Mad Hatter studios. The goal was to overdub piano on 12 songs and cut two new tunes; one live with upright bass and one solo piano. We used one of the two 9-foot grand pianos available in the A room, one is a Bosendorfer and the other is a Hamburg Steinway. After playing and listening to both, we chose the Steinway. I decided to use two AKG C-12 microphones for the recording and ran them through two outboard Class A Neve 1073 mic preamps. We ran some recording tests using various miking position and pattern choices until the artist had exactly the sound he was looking for.
Nuts and Bolts of Recording the Piano
As we talked about last week, acoustic piano lends itself well to stereo recording. There are a number of miking techniques you can use, depending on the sonic characteristics you're trying to achieve. If you're in an acoustically poor room, the piano is best mic'd up close so you don't have to fight with bad ambience. If the room is a good one you can move the mics back and get more of an open sound. Just a foot either way can change the tone a lot so be sure to experiment with placement and don't settle. Here are three basic techniques, two up-close and two pulled back.

Figures one and two show two techniques, one using two mics and one using three. Three mics would be used if you want more extension in the low-end. The microphones should be equidistant from the strings at about six to eight inches. Always check for the phase relationship by putting the console in mono and flipping the phase button. If you hear an absence of low end when you flip the button then you have your mics too close to each other. Refer to the feature on mic placement for some pointers on phase.

Figure three illustrates the technique I used for this session. The lid to the piano was opened to the long stick. The mics are about heart-high if you're standing next to the piano and just inside the outer lip of the lower frame. The on-axis part of the mic is pointing towards the strings at a 45 degree angle. With this scenario you can move the mics back or closer to get more ambience. This is very subjective and will vary depending on the piano, player, type of music, and the room. You'll notice I used the mics in spaced pairs rather than in an x-y configuration. This is because the x-y technique works best with smaller capsule microphones. Because of the capsule geometry in larger diaphragm mics, the off axis response can be boomy in the cardioid pattern. If you use x-y, you're exposing this off axis side of the mic to the center of the instrument. Spaced pairs is a better way to go with large diaphragm mics in cardioid pattern.
Picking a Pattern
Once we decided on the mic position we experimented with switching the patterns on the mic. We went from full omni to cardioid, passing super and hyper cardioid along the way. We recorded a bit of each and then listened back. We decided that a wide cardioid was the best sound; wide cardioid has a broader pattern and lets more sound in from the rear than regular cardioid. As far as EQ, I added 2dB at 12K to get some 'air' on tape. We were recording to analog two inch tape and I use a bit more EQ in this situation than I do with digital. The reason is because if you add EQ later, during the mix, you also boost tape hiss. (10.6.1997)
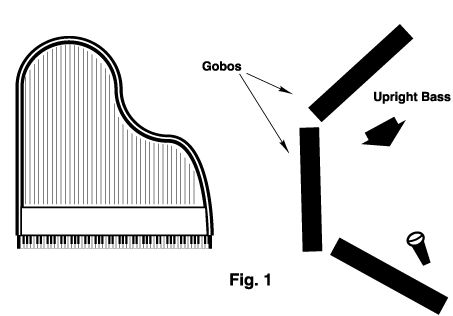
Recording electric bass is probably one of the easier tasks you'll undertake as an engineer; however, it gets a bit trickier to record when the bass is acoustic and playing live with another instrument. The objective for this session was to record an upright bass and piano together on a jazz ballad. Close proximity of the players was more important than isolation in this case so I opted to have the players in the same room. We built a nice portable 'room' around the bass player, (bassist, Paul Morin of Los Angeles), using some gobos. A gobo (short for go-between) is a portable wall on wheels that is about seven feet tall and six feet wide. There is sometimes a window at the top so players can see each other. In addition we put a carpet on the floor underneath the bassist to help tame reflections. See figure 1 to see the placement of the players in the room.
What Mics to Use?
The mics I used for the bass were two Neumann U-67 microphones (large diaphragm mics are my preference for upright). One microphone was about knee high pointing up at the bridge and the other about heart-high pointing at the strings, both mics were about 18 inches back from the instrument. We routed the mics through the board and I added a couple of dB at 56Hz on the lower mic. I also put the lower mic through an LA-2A compressor to tape. There was some leakage of the piano onto the bass mics but not enough to be a problem. The overall effect was like you were in the room listening to the players; very nice and intimate. The upright had a pick-up on it but in my experience these never sound as good as having it miked live. On the third try the players locked and rendered a beautiful take of the song. It was a pleasure working with such pro's with nice instruments.
Next week I'll be back from Germany and I'll lay out some live sound tips from the Bergerfest. (17.6.1997)
I spent more time in the early part of my engineering career trying to get a great bass sound than anything else. I tried going through a direct box. I tried miking the amp. I tried different amps. I tried different mics. I tried everything!
No matter how hard I tried, I always fell short of the mark. I went in search of the Holy Grail for bass sounds but never found it. I realized with time that the answer wasn't a singular prescription for success, but a collection of techniques that could be used as each situation dictated.
The first step in getting a good bass sound is of course, having a good sounding bass. "Good" being a subjective word, of course. With that in mind, let me simply say that the bass should have a nice balance between a rich bottom end and an articulate top end, great intonation, nice sustain, and no rattles or buzzes.
A few basic things to know about recording basses; First, and maybe foremost, the player has a great deal to do with the sound. As with many instruments, it's mostly in the fingers.
Second, the natural sound of the instrument is important. If the tonality isn't there to begin with, it's difficult at best to fake it. All the tube preamps and eq in the world can't hide a bass sound that's dull and lifeless.
Third, the strings. Round from flatwound, brass verses nickel. They all have a sound. The sound you like will be a personal choice. But, let me add that the song you're recording can and should dictate the type of sound you are going for. In other words, the bottom shouldn't sound alike for every type of song.
Fourth, recording a bass guitar with a direct box sounds differently than recording the bass by miking the amp.
Fifth, the tone you get on the bass itself will play a major role in getting your sound. Don't set and forget the onboard tone controls. Experiment.
Let's start with a direct box. There are many different brands. Some sound better than others. Do your homework. Ask your friends or engineers you know which they prefer. Try to find the brand and model which gives you the most bottom end, while also giving you the most definition or attack on the mid range frequencies. My personal favorite at the moment is made by Sans Amp.
It's usually best to use a compressor/limiter in line to keep your bass's signal from slamming into the red on the VU meter. A 3:1 ratio with a fast attack and slow release usually does the trick. A little higher ratio will give you more "punch" - too much compression will make the bass sound squashed. As always, experimentation is the key. And yes, tubes do make a difference. They'll arm up the sound, but they won't perform miracles.
I find that with most basses, I need to add about 4 db @ 80 HZ to fatten up the bottom end coming out of a direct box, and moderate compression gives me the "thump" I'm looking for. The more you can do with a bass's tone controls, the less work you'll have to do with equalizers.
I've also noticed that many direct boxes don't have a very fast slew rate. In plain English, that means the signal's rise and fall time is sluggish. What that means to the sound is the attack of the top end is often diminished, not due to the tone of the instrument, but the inadequacies of the box. Keep your ears open, and try several models. You'll be surprised at the wide range of sounds.
For miking the bass through an amp, I'll use a Fender Precision Bass as my imaginary example, and an old Bassman amp. A classic combination. I like to mic the cabinet with two microphones. A Senheiser 421 facing directly into one of the speakers at point blank range, and an AKG 414 (or any other good condensor mic) about four feet back from the cabinet. The close mic will give a more direct sound with an accentuated attack, and the distant mic will give you more of the low end (it takes several feet of "air" for a bass wave to develop).
By using various combinations of the two mics, I'm able to get a great sound that often just can't come out of one mic. While two mics can often spell trouble because of phase anomalies, this is a case where those same problems can work to your advantage. By balancing the signals different ways, you are effecting the phase relationship between the two mics and altering the eq curve, hopefully for the better. The amount you vary the signal is of course controlled by the faders on the respective channels of the console. The amount you move the faders to change the sound can often be measured by hair widths. A little dab will do ya!
Just for kicks, you can try adding a direct box to the aforementioned scenario, and send all three signals to the same track. The direct box often adds clarity to the whole sound that is nothing short of wonderful. Lesson learned: As always, experimentation pays. Be patient, be persistent, and most importantly, don't print it to tape unless you love it . . . or your client is getting ticked-off that you're taking way too long to get the sound!
During Michael Laskow's 20-year tenure as an engineer/producer, he worked with Crosby, Stills, Nash and Young, Eric Clapton, Cheap Trick and countless others. He continues to write articles for magazines like Recording and Electronic Musician. He's also the founder of TAXI, an independent A&R company that links record labels with unsigned artists and songwriters. (http://www.looperman.com/tutorials_bass_recording_bass.php (9.1.2005))
You really can't go wrong running bass direct. It's like the sm57, it will rarely sound amazing, but it will always get the job done. Micing up a good bass amplifier and mixing it with the DI signal can be the road to a really great bass recording, but it also adds a lot of variables that can turn messy fast.
One of the things about going direct is that if you're going to do so, use a good DI. I hear that the Countryman (or something like that) is quite good, and a lot of people like using high end preamps for the direct box. Theres a lot of difference in using a good preamp (Countryman, Avalon, even a SansAmp) and using a passive DI box into the console.
I just plug the bass player into the front input of a Great River MPNV-1 and record dry. At mix time a apply heavy 8:1 or 16:1 compression with about 4 db reduction to make it nice and smooth... if nice and smooth is what I'm after. (http://homerecording.com/bbs/archive/index.php/t-120490.html (9.1.2005)
Live:
Most venues use a direct box. One output goes to the amp for stage volume, and the other goes to the sound engineer's desk. The same can be done with a Sans Amp, if you're using one.
Recording:
Here's where it gets tricky. Getting a good bass sound is tough, because there is so much going on, frequency-wise. You want to get low end, of course, but you don't want to miss out on a great bass tones midrange growl and you need the high frequencies for finger noise, otherwise the sound is over-damped and lifeless.
The simplest way to record bass is with a Sans Amp and compressor. This will get you a fairly good tone, just going straight into the desk, but you will need to do some tweaking. Expect to set the compression ratio to about 4:1 with a pretty low threshold. That is a generalization, of course.
For my upcoming album, we went with a different approach. My bass player uses an Ampeg stack, and this is what we did:
After dialing in a good tone in the room, we blocked off the area around the amp with studio baffles. This keeps room reflections from coming back into the mic's at oblique, out of phase angles. A blanket thrown over the amp will have the same basic effect. You want as much direct sound from the amp as possible. We turned it up to live playing volume in order to get the amp really cooking. (It's an Ampeg SVT 350H head)
I split the signal using a BBE 411 (from 1985, I think), with the process off, but I did use the gain. A direct box will do the same thing. One output went direct into the amp head, and the other went direct into the HDR (hard disk recorder).
For the top 4x10 cab, I placed a BLUE The Ball mic on it, centered on one of the drivers, close to the cab. This mic ran to an ART tube mic pre, phantom on, and then balanced into one channel of the HDR (hard disk recoreder).
For the bottom 1x15 cab, I placed a Shure SM57, slightly off axis, also close to the cab. This ran balanced into another channel on the HDR.
We then tracked each input to its own seperate track. That gives you total flexability to dial in any tone you want, and then you can correct/mix it with EQ. When recording this way, we use compression at the mixing stage, not the recording stage.
NOTE: This was done at my own studio, not at a commercial facility. It doesn't take a lot of $$ to get a great bass sound, just time + patience. (http://seymourduncan.com/forum/showthread.php?s=daea92c4cc248595ebcf5a34c77c1258&t=11832 (9.1.2005))
Last week we got into miking techiques and choice when recording an upright bass. This week I'm taking off on a bit of a tangent but it's related as far as mic placement and getting the most out of the situation you're in. My approach to live sound incorporates a lot of the things I've learned in the studio and through watching how others work, namely Robert Scovill and a few other colleagues where I teach. From watching them and asking questions, I've been able to get a lot of cool info that I incorporate when I do the occasional live sound gig. This last week I was at the Burgerfest in Regensburg Germany. There were 16 stages set up around town ranging from the small stage set up for dance and theatre to the very large setup for bigger bands. I was traveling with a 20 piece band that included dancers, singers and musicians. We were exposed to the very inadequate to the more than adequate stages in this large venue. I'm going to use this week to give you a quick overview on live sound and the theories I've used to make it work especially when you have limited resources.
Problem: You have a rhythm section including drums, bass, two guitars, two singers up front, four trumpets and a sax. You only have a ten channel mixer and 9 mics.
Solution: Punt. This was a bit scary. The venue was a large, open outdoor plaza with a nice size stage. But the sound system was woefully inadequate as was the mic selection. This was to be the worst of scenarios for these four gigs we were to play. I had to cover all the instruments and singers with the nine mics. In addition there was no snake, so I had to mix from the stage. YIKES! I basically just laughed and made lemonade. You've got to accept the fact that it's going to sound bad no matter what, but you can still make the best out of the situation with a careful setup and plan.
First off you've got to have someone in the audience whose ears you trust. For me that was my chum Steve Olea. In addition to helping me set up he was to be the point man who was to tell me what was going on 'out there.' My plan was VERY basic. Drums got a kick and an overhead mic. The drum kit had a front head on the kick which due to a quick setup I had no time to alter. If I learned one thing this gig it was, ALWAYS take off that front head. Even if you have to duct tape the drummer to stop his protests. In the studio, when the drummer has insisted, I've miked a kick drum with the front head on, never liking the outcome. I can surely say that I didn't like the outcome live either, too much leakage and no low end or beater definition. We ended up dumping it after the first song, leaving the drum kit way undermiked. But success is learned from a pile of mistakes and we all make them. Next I gave the trumpets two mikes along with a vocal mic for the left side of the stage. In addition the other side of the stage got two mics, one for vocals and the other for sax. Lastly there were two wireless mics that we used for the front vocalists. We brought our own with battery powered transmitters and mics, they worked flawlessly and I was impressed with the level I was getting out of them. I don't recall the brand but if you're interested send me some email and I'll find out for you.
After no sound check I just brought up faders nominally and used the first song to set up my mix. EQ was guess work as was initial fader levels. I had no compression and no reverb. The compression is what killed me. The vocals were so dynamic that they ate up all my headroom and then some. My kingdom for a DBX 160 and a subgroup insert! Due to the fast pacing and number of cues in the show I had to remain at the mixing position, never getting to go out and hear for myself what was going on. So I relied heavily on my point man. Through a number of hand signals he related to me overall level adjustments. For real trouble spots he came up to the stage and related what had to be changed. As the crowd got thicker (1500+) he had to remain out in the house. We got through the show and got the encore chant (zu ga-bay, zu ga-bay) so I guess it was good enough for an encore at least.
Recap
The lesson I learned here was that no matter how good you think you are, you're only as good as the equipment you use. No amount of skill can make up for bad or inadequate gear. Humility is a good thing.
Next week I introduce a new studio toy I just got and back to some more miking scenarios. (24.6.1997)
What's Important?
One of the most challenging things to record is the human voice. To get the right performance, you not only have to be a competent engineer, but sometimes a cheerleader and psychologist. First let's lay out what it takes to get a good vocal sound. I stress signal chain time and time again and here I'll say it again: The room, mic, cables, pre-amp, compressor and recorder will determine the sound you get. My recommendation is to use the best you can afford in all categories. If you don't have the best in one department, borrow or rent something if you have an important session. My favorite choices for female vocal is an AKG C12, for male vocals it's a Telefunken 251. Both of these are tube mics and sound great, but they're also expensive. If you have a few to choose from, don't be afraid to try them all. Time spent up front experimenting is never wasted. The limiter/compressor you use is just as important, some styles of music call for a compressor with a big footprint. This means that you can hear it working. Other styles, like Jazz, call for a more transparent sound. Train your ear to hear what compression sounds like in a track. I would bet the farm that there is compression on 99% of the vocal tracks you've ever heard. The bottom line: Always use the best gear you can.
The Surroundings
The recording environment is just as important as the signal chain. A recording space that's too live will cause ugly reflections back to the mic. In this case, it's necessary to deaden the room. This could involve anything up to and including nailing packing blankets to the wall and stuffing foam behind them. Remember you're not only recording the vocalist but the room that they're in. The pros use gobos to build a 'room' around the vocalist. I was able to use gobos to great effect in isolating an acoustic piano and bass player at a recent session. In addition For vocals, it's a good idea to lay down a rug to keep from picking up tapping feet and deaden the floor reflection. Another thing to keep in mind is the angle and reflection off of the music stand. You don't want the vocal reflecting off the stand into the mic, this can cause phase problems. An easy solution is to put some kind of refractive material on the stand such as a piece of thick carpeting or a towel. Also be sure to angle the stand down a bit so the reflection is going away from the mic.
Where Does the Mic Go?
Positioning the mic is crucial in getting a clean sound without any plosives. A pop screen will be needed in addition to precise positioning. Plosives are the Ps and Ts that ruffle the diaphragm of the mic, causing unwanted low end information to get onto your recording. Position the mic so the diaphragm is just below the singers nose and pointing down towards the mouth at about six inches away. Then put the pop screen (a ring with a nylon material stretched over it) between the singers mouth and the mic. This should be sufficient to do the job. Some repositioning may be necessary if you're still having problems. I've also had problems with rattling jewelry and popping gum. (I'm starting to sound like a grade school teacher!) If this gets on tape it will be impossible to extract later.
Psychological Aspects
Last and most important is making the singer comfortable. A great headphone mix helps. I've also brought candles into the studio and dimmed the lights for a good vibe. I once worked with a singer who was very good but had no confidence at all in her ability. If this happens make a concerted effort to use no negative language. When they say THAT SUCKED! You say, 'that pass was good, now lets go for a bit more power (or whatever you're needing for the track)' I don't use the word 'no' or 'don't' or 'never,' only positive language and encouragement. I've used this technique a lot and have gotten great results. People will respond to praise and positivity and by the end of the session will thank you for helping them sing better. (1.7.1997)
Recording live brass is a lot of fun and it's not that hard to do. There's nothing like a great brass section playing a great chart to really kick a track in the butt and make it sing. Even though synths and samplers are able to copy a lot of horn sounds very well, there is a 'freeze-dried' sound to sampled brass that, frankly, sounds boring.
The Basics
By following a few simple guidelines, you can get a great horn sound.
First, keep in mind that horns play best as a section. There are numerous
cues and signals that a section gets from one another that makes them play
as a team. Taking one horn and multi-tracking it over and over will not
give you this 'team' sound. Your best bet is to find a group of
players from a band, or better yet, session players who have played together
time and time again. Remember, this is an ensemble, complete isolation is
impossible. Putting the players in separate rooms defeats your purpose.
A certain amount of leakage is inevitable and not necessarily a bad thing.
However, you can give yourself more flexibility when mixing by placing the
players properly in the room. Figure 1 shows a layout example for a seven-piece
horn section. The placement of the players and use of a cardioid
pattern mic will limit the leakage into opposing mics. I like to use
one mic for the trumpets. This puts the blend responsibilities on the players,
where it should lie. Also, the less mics you have in the room the less phase problems you'll have.
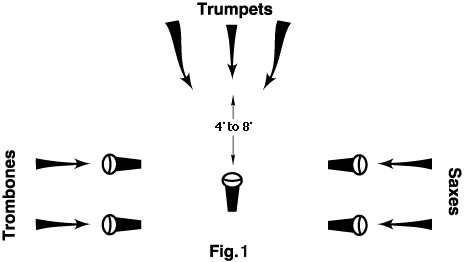
Expect a lot of trumpet leakage into the other mics, simply because they are the loudest of all the instruments. By close miking the trombones and saxes you will get more level onto tape and help with the trumpet leakage. Also, notice in Fig. 1 that the mics used for the trombones and saxes are off-axis to one another. This also helps with the leakage.
The mic for the trombones and saxes can be six inches from the bell. If you were miking these instruments solo, you would have the luxury of backing the mics up a bit. On saxes especially backing up the mics is desirable because the sound of a sax does not come solely from the bell, but from the keys as well. So if you back it up a bit you'll get a better sound. However, in ensemble the closer scenario is better.
Track Layout for Flexibility and Big Sound
By taking the three groups of horns to three tracks on your multi-track, you'll give yourself the best possible opportunity to blend the horns during mixdown. If you're looking for a bigger sound, doubling is great way to make your horn section sound huge. To save tracks on the second pass of a double you might combine the saxes and trombones together and only use two tracks, one for trumpets and one for sax and trombone. This way you have the best of both worlds, individual tracks on pass one and the big sound of a double. (8.7.1997)
Recording drums is probably the most challenging situation you will ever come across in the studio. The microphones you use and how you place them is important, but some initial preparation will help you get great drum sounds and really lay a nice foundation for your track. In major recording centers like Los Angeles and Nashville, having a tuned kit with new heads is the standard operating procedure for all the first call studio drummers. They have full time drum techs who cart their drums around, change the heads and tune them before each session. However, if you're working in the other 99% of the country, you as an engineer might have to take responsibility for making some of those things happen. When I'm doing the pre-production meeting for a session (which can be as simple as a phone call), I always tell the band and drummer that if you want this record to sound great, put new strings on the guitars and new heads on the drums (tuning an acoustic piano is also a must). No amount of EQ or signal processing can resurrect a cardboard sounding drum kit after it's recorded. You must have a good sounding kit up front and it must be tuned. I found a great tool for helping me tune drums with the Drum Dial. It's featured under product of the month, it's worth checking out.
The Environment
Something you need to assess and be aware of is the room you're recording in. Not only are you recording the drums but you're recording the space that they're contained in. A room that has acoustical problems such as standing waves and ugly uneven reflections can ruin the best sounding kit. If you are stuck recording in a poor room you may have to put up some packing blankets or use gobos to help you tame down the room.
Now that we've established the importance of having a good sounding kit and room, the next step is to get it on tape (or hard drive). Making a drum kit sound like one organic unit is always my objective. For starters, stand in the room as the drummer plays and actually hear what the kit sounds like in that space. Then try to emulate that as much as possible. Because of the number of mics used in recording a kit, you could run into the problem of it sounding too much like a collection of separate drums. You want it to sound more like a whole instrument rather than a group of individuals. (15.7.1997)
Kick drum:
You need a mic that will handle high SPL (Sound Pressure Level) and also cover the low end as far as frequency response goes. Some choices are:
Snare drum:
I've tried a number of others but still keep coming back to this simple, inexpensive mic. I love it. Another option is to use a second mic on the underside of the snare drum. This can be another 57 or perhaps another dynamic mic like the Beta 57. If you have a condenser that can take the SPL then by all means try it. The idea of this mic is to accentuate the sound of the snares on the underside of the drum. Mixed with the top mic it can give you the snap that you need if you aren't getting it from the top of the drum.
Hi-Hat:
Toms:
Overheads and room mics:
Basically any matched pair of condensers will work here if you're stuck. For the most part you'll want a cardioid pattern for the overheads and you can experiment with the room mics.
These mic choices are just guidelines. You may have your own favorites or want to try others. The important thing is to get the killer sound that you need to make your track a standout. Next feature, we will be covering microphone placement for all the different drums. (22.7.1997)
Last feature we picked a number of mics that would be good for recording a drum kit. Now we'll discuss specific microphone placement strategies.
Kick drum:
For me, the best scenario is to have the mic inside the kick drum. You'll never get great beater definition and isolation if the mic is outside the front head. I've heard of guys miking the outside of the front head and then miking the beater side. I've tried this and it was a nightmare of leakage and didn't work for me. I like to put the mic inside the drum. This can be accomplished by taking off the front head or if there's a hole in the head, putting the mic through and positioning it inside. If the head is all the way off then it's a good idea to build a little isolation 'house' around the outside of the front of the kick. A chair, some duct tape and a packing blanket or two will work nicely for this. This will help isolate the drum and your mic. In addition you may need to put a blanket or a pillow inside the drum to deaden the inside a bit. A kick that's too live will give you little definition and can be ugly. DW Drums (Drum Workshop) makes a nice hourglass shaped pillow that is cheap and works great.
I place the mic a little more than half way into the drum and point it just to one side of the beater. I've seen others put it more off axis to the beater head depending on what the drum sounded like. You'll have to experiment and see what's right for your particular situation.
I recently talked Robert Scovill about how he miked Neal Peart's kicks for the most recent RUSH tour. He came up with a home rigged mic assembly for the inside of a kick that has the front head on it (no hole). He criss-crossed some cables that he rigged on the inside of the kick and fixed a mic clip to it at the center. He used turnbuckles to get the mic clip placed precisely where he wanted it. Once he fixed the mic inside he closed up the outer head. The cable came right out of the drum and could be sent to the snake easily.
Here are some scenarios for placing mics on a drum kit:
Snare drum:
Snare is miked as in Fig. 1. About 2-3 inches off the head and pointed in from the side. This keeps the mic out of the drummers way and vice versa.
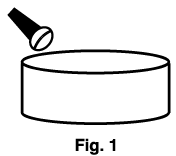
Toms:
Tom miking is very much like the snare in Fig 1. Sometimes if I'm not getting enough low end from my low tom I'll put a condenser or a D-112 underneath the bottom head. This is then mixed in with the top mic, and after checking for phase, is sent to a separate track on the tape machine. If you're feeling brave or have limited track resources, you could mix this with the top mic feed to one track.
Hi-Hat:
There are a number of different techniques for hi-hat miking. The desire is to keep the other drums out of the hat mic as much as possible. I've seen it pointed away from the drummer and down at the outer edge of the hat from the top. You have to watch that the mic isn't pointed at the bell because it tends to sound very pingy and thin. Also, don't get too close to the closing edge because a puff of air comes out every time the hats close and that can ruffle your diaphragm and make for nasties on tape.
Overheads and Room mics:
Overheads can be placed in an x-y configuration or in a spaced pair. (see the feature on mic placement) If you use omni patterned mics then the spaced pair is the way to go. Large diaphragm condensers tend to work better in spaced pairs also. Small diaphragm mics work great in either scenario. In general I put the mics about 6 to 7 feet from the floor and if spacing them, try to capture a balanced sound from all cymbals and toms.
Room mics can be placed equidistant from the front of the kit and back. How far back and how wide you place them will determine how big your room mics sound. Remember that for every foot you add one millisecond of time delay from the source. So if your room mics are back 10 feet you're mics will have a delay of about 10 milliseconds. The best rule is to experiment and see what you get and if it pleases you and compliments the music then go for it. I always print room mics separately.
Once again these are just guidelines. You should make yourself aware of as many techniques as possible and try them for yourself. (29.7.1997)
Track Sheet Layout
How you lay out your track sheet depends greatly on how many tracks you can afford to dedicate to your kit. The best scenario is total isolation of all drums. I like to dedicate a track to each tom, but you can sum these to stereo if you're stuck for tracks. The reason for all the isolation is to be able to treat each individual drum with, EQ, panning and reverb. Once you sum drums to stereo you'll not have the flexibility to do this (EQ for the group of toms can be done in stereo however). (see August '97 Question of the Month).
For our purposes let's say you have 24 tracks available. Below is an often used layout for drums within this framework.
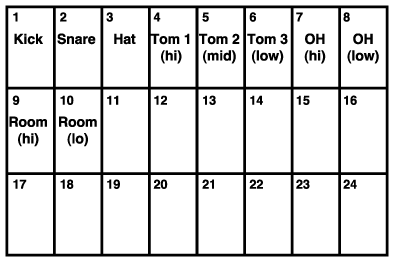
Notice the extra info as far as panning and which side of the kit the drums are from. Very important info for the next engineer down the line. You might also include what mic you used.
EQ Guidelines
As far as EQ goes, I've said in the past that EQ is the LAST thing you should do to make something sound better. Mic placement and choice is your first refuge when things are not sounding good. Also, keep in mind that new heads and tuning goes a long way in making a drum kit sound great. (click here for a feature on advanced drum tuning) In light of that here's some general EQ I use when tracking.
Kick drum:
Snare drum:
Hi-Hat:
Toms:
Overheads:
This is all very subjective and depends on the kit you're recording. So it's NOT gospel, just meant as a guideline. By the way, I never gate to tape, only from tape, and I always EQ to tape, especially if analog. Everyone has their own particular style of recording. This is mine. You will be a better rounded engineer by getting a lot of different perspectives on recording and taking what you like from that. This way you'll develop you're own style. (5.8.1997)
Direct or Miked?
There are two ways of recording electric bass: Either by taking a direct feed out of the instrument and putting it through a direct box, or miking the speaker of a bass amp. In the studio, it would be safe to say that the majority of bass recording is done direct. Doing it that way solves a lot of leakage problems and makes it easy to get a great sound. This is not to say you can't mic a cabinet as an option. In fact, it's a good approach to isolate the bass cabinet and mic it during the session or to reamp it afterwards. This way you could have different tracks for the direct and miked feeds and then mix them later. It's actually very easy to split the signal in this way, because in addition to the balanced output, a direct box has a thru. This way you can take the unaltered signal from the bass and plug it right into an amp. This is invaluable for live situations where you'd want to take the direct signal through the desk for the front of house and monitors and also have the bass plugged into the player's bass cabinet on-stage.
Why Do You Need A Direct Box?
When recording direct, a direct box is needed because the output of the bass is high impedance, and a console likes to see a low impedance input. In addition, the bass is unbalanced, and most consoles, even down to a Mackie, will take a balanced input. A direct box is kind of a translator that takes an unbalanced high impedance signal at the input and produces a balanced low impedance signal at the output. Direct boxes come in passive and active varieties. An active DI needs power to run and a passive one does not. Power is supplied by either a battery, or by phantom power from the console. Either style works fine, so it boils down to a matter of personal taste for the type of music you're recording. Personally I like to use my Calrec mic preamp as a DI at the front end. A lot of standalone mic pre-amps will have a 1/4" input on the front so you can use it as a DI. I get a lot of questions about compression and bass and I'd say it's safe to say that it is common to compress the bass when recording. This limits the dynamic range and keeps the bass up in the mix without eating up all your headroom.
Using these guidelines will help you record a nice clean signal and give you some flexibility later on when you mix. (12.8.1997)
Last week we covered the recording of electric bass, this week we get into some advanced drum tuning techniques.
Tuning is the thing
Some of you use a house drum kit when you record. Whether it be your own kit or one you have access to, accurate tuning can make your recording experience a pleasant one. In an earlier feature we talked a bit about the importance of tuning drums. Now we get down to the meat and potatoes of tuning. I'm sure you've all heard the joke about the drummer who says 'You mean you can tune these things?' It's the last thing a drummer learns if at all and it's THE most important thing in recording. If you have garbage as your source, even the best signal path won't help you.
I have to give all of the credit for the following information to the DW Drum Company. A student of mine compiled their data for a recording business presentation. I've just paraphrased it for you here.
Theory and Execution
Each shell of a drum kit has a resonant frequency. The frequency can be found by removing all the hardware, suspending the drum and tapping it to find the tone. This can then be matched to a tuning fork etc. as a tuning source. Once you find the resonant tone you use this to tune the drum heads.
The important thing is that no two drums of different sizes overlap each other's timbral frequency range. Ultimately you want a set that's matched in tone. The intervals far enough apart so the drums complement each other without the sympathetic vibrations causing problems. Bigger drums such as the kick and low tom should be a fifth apart where as you get smaller and smaller it can be a fourth apart. DW matches their drums in this way and sells the sets with complimentary midrange timbres and traditional intervallic relationships. However you can find the pitch of any drum in the way I described above.
Once the pitch is found you can then match the upper and lower heads to this pitch. Then using a precision tuning device such as the Drum Dial you pitch the upper head up and the lower head down a bit from the shell's pitch. This makes the drum heads ring with a sympathetic tone and have a desirable sustain and timbre. When you tune a whole kit in this fashion and memorize the settings on the drum dial, it's just a matter of keeping the kit maintained properly. It's science when you use the proper tools. I can't stress enough the importance of getting into recording on this ground level. You can't expect merely a knowledge of consoles and microphones to get you through a session. It's important to know a lot about guitars, drums, humans etc. to get you great results. Keep your eyes here for more info along these lines. (19.8.1997)
The Problem
A recording studio can have miles of cable running from here to there and back again. When making cable runs of any length it's important to be able to reject any noise that may jump onto the line from a number of sources. Radio Frequency (RF), noise from dimmers or fluorescent lighting, CB radio transmissions, AM/FM radio transmissions and more can end up hitchhiking along with your signal. Think about it, when you lay out a length of cable you are essentially making an antenna. When you lay out thousands of yards of antennas it can be a nightmare.
The Solution
The best way to remedy this is to used balanced connections throughout your studio. The difference between balanced and unbalanced cable is an extra conductor in the wire. An unbalanced connection runs two conductors, a hot (+) and a ground. A balanced connection runs three conductors, a hot (+), a cold (-), and a ground. What makes the difference is not in the cable but in what happens at either end, before and after the signal travels down the cable. Any cable can be an antenna and a noise collector.
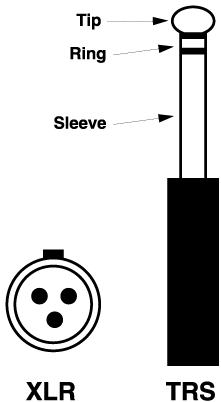
First lets look at balanced connectors. You can see that they come in two common forms, one is an XLR or cannon plug and the other is a TRS 1/4" connector. Don't confuse this balanced connection with the balanced connector that's used on some consoles. On a number of Mackie consoles for instance, they use a TRS to run an insert in and out of the board. This is not balanced but using the three connections as in, out and ground. One connector does the job of two and it's not balanced.
What makes a balanced connection work, is some electronic trickery that makes the noise on the line phase cancel itself out of existence. (Remember our feature on Phase?) Here's how it happens. A balanced connection first runs through a differential amplifier which splits the hot signal into two and flips one half 180 degrees out of phase. This travels along the cable as plus and minus along with the ground on three separate conductors (on an XLR, pin 2 is hot, pin 3 is cold and pin 1 is ground). Along the way, the usual noise is encountered and picked up by the line. At the other end of the connection, the minus is flipped back into phase and you end up with a plus and a ground again, just as it was when you started. The difference is, that now the noise is out of phase with itself and cancels completely. (26.8.1997)
Last week we talked about console dynamics. As long as we're on the subject we're going to further explore the basic set-up of gates and compressors.
The Starting Line
Just like you do certain things to set up your car when you start it (seatbelt on, car in park or neutral if it's a stick etc.), there is a basic starting point that you can use when setting up compressors and gates. This makes it much easier to get the device to do what you want it to do right off the bat. If your device has been used in a previous session and is already setup for something different than the instrument you're going to use it on, it can be a challenge to get it going. Not that I'm not one for challenges, but if you can start out the device fresh your job will be easier. The idea is to use the following setups as a starting point and then tweak your signal until you get exactly what you want.
Compressors
The routine for setting up a compressor is as follows:

I'm purposefully using a very simple compressor such as the DBX-160X as a template here. Other compressors may have more features, but if you can start out with this one and can master the basic parameters, then you can easily jump to something more complex using the same principles. Before we run through what each parameter does, let's explore compressors for a second. Compressors work by leaving all the audio below the threshold untouched and compressing all audio above the threshold. All compression is done according to the ratio. The ratio works like this: 2:1 would mean that for every 2dB over the threshold you'd get 1dB back, this is called gain reduction. If you flip 2:1 over you get 1/2, this means you'd get half your level back of the signal over the threshold. 3:1, 4:1 etc. all work the same, you're just getting less back compared to what you put in. Various compressors sound harsh or transparent based on the attack and release settings. If you don't have attack and release settings these parameters are said to be fixed.
Gates
Gates work by opening up and letting audio pass when the threshold is crossed and closing when the signal falls below the threshold. Basic gate setup is as follows:
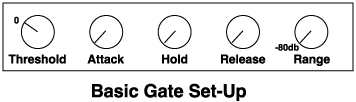
Threshold the setting where the gate opens up, Attack is how fast it opens, Hold is how long it stays open after the attack, Release is how it tails off (slow of fast) and Range is how low in level the gated signal will be heard. (4.11.1997)
Why Use EQ?
EQ should be your last line of defense when recording. Microphone positioning is a better solution to frequency problems. For instance, next time you're recording an acoustic guitar, put your head in and around where the player is and notice how the sound changes. Up near the neck you get more of the string sounds and it's a bit thinner. As you travel down near the sound-hole it gets fuller and at the tail of the guitar, high frequency falls off and you get more lows. Where your mic is placed will determine how it sounds in the control room. Also keep in mind that you're listening in stereo, if you put one mic up and expect it to sound like it did when you were in the room with the player you'll be disappointed. Even when you're going to one track of the multi-track, put up two mics and buss them both to one track. This gives you the benefits of stereo miking even when you can't afford to lay it down that way.
There are times however that EQ is your only way to shape your sound
and add the ingredients necessary to have it come out
1...2...3 Types of EQ
Although there are other kinds, the following three types of EQ are the most common that you'll encounter at the console. Each number below also represents the amount of controls you'll have to adjust.
One
This type is called Tone Control. You get one control, boost and cut of a fixed frequency. You'll see this type of EQ every day when you get in your car. Bass and treble control on your car radio is a basic tone control. These are most likely factory-set at 10k at the top and 100hZ at the bottom.
Two
This kind is called Sweepable EQ. You get two controls, boost and cut and a frequency sweep control. The sweep varies, sometime it covers a small area but mostly you'll find that manufacturers cover a large piece of tonal real-estate, especially in lower priced consoles. Common labeling might be 4k to 18k at the top and .5 (meaning 50hZ) up to 8k in the bottom band. By the way, when you hear the term 'bands' of EQ, that is referring to how many different volume/sweep control combinations you get on a console. For instance a four-band EQ would cover lows, low-mids, high-mids and high frequency, all separately.
Three
This is called Parametric EQ. You get three controls, boost and cut, frequency sweep, and 'Q' control. 'Q' stands for bandwidth, it refers to how big of a piece of frequency real-estate you're affecting when you boost or cut. These are called wide or narrow 'Q' (narrow is sometimes called high 'Q'). What the 'Q' determines is how many frequencies around your target frequency you're affecting. The drawing below illustrates what I'm talking about:
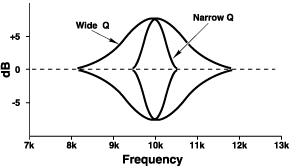
Summary
These three types are basic. Some manufacturers might give you an either or 'Q' control on a sweepable EQ. This would be called semi-parametric because you only have narrow or wide options and not a sweepable 'Q.' Once you've absorbed this info, be sure to see my feature on Advanced EQ. (11.11.1997)
Shelving EQ
One option you'll often find on the upper and lower band of a console's EQ section is the ability to shelve the EQ. Shelving refers to the ability to boost or cut a certain frequency and then all the frequencies beyond that, either at the top or bottom of the spectrum (see the illustration below). Shelving can be a switchable option or built-in, depending on your console. Most types of EQ, as a default, let you boost and cut at a wide 'Q.' This uses the bell shape that you saw in the artwork of last week's feature. Overall, it's the smoothest way to boost or cut. Instead of using a wide 'Q' you may want to create some 'air' in certain mix ingredients. The term 'air' describes an overall high frequency sheen that shelving creates. This is very useful for lead vocals and perhaps a solo instrument that you want to give a special quality to. If overused, it makes your mix top-heavy. Used wisely it gives focus to important mix ingredients like drum overheads, certain percussion and vocals.
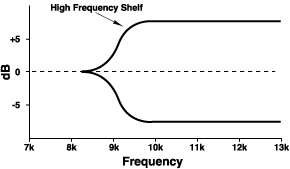
If you cut the low frequencies of certain mix ingredients you eliminate unwanted low frequency clutter in a mix. For instance, let's say you have a home studio that's not completely isolated from outside noise and you live near the freeway (I've worked in many such places). Every time you record vocals, or anything using a microphone, you'll get a lot of rumble and low frequency hash on tape. This is further accentuated by using a digital multi-track because of the low noise floor. Because these machines are so clean it leaves that low frequency noise more exposed. By shelving out the low end where it's not needed, say on lead and background vocals, you clean up the problem. For instance, you wouldn't shelve 50Hz out of a kick drum or bass track, but on a vocal or sax solo it would be fine. You're not using that part of the spectrum anyway. I assisted for one famous engineer who as a rule would go through and shelve out the low frequency on any track where he wasn't using it. Not a bad practice especially in today's digital world.
Parametric vs Semi-parametric
Two other types of EQ you may encounter are parametric vs semi-parametric EQs. The 'Q' control option of a fully parametric EQ allows you to adjust the bandwidth. Sometimes to save money a manufacturer will give you an either/or bandwidth control. You can either choose wide 'Q' or narrow 'Q.' This is done with a button or incorporated into a push/pull frequency sweep knob. This is called semi-parametric because of the either/or nature of it as opposed to a true sweepable 'Q' you'll find on a fully parametric EQ. (18.11.1997)
Last week I hand-picked some more books that will benefit you and your recording/musical skills. This week we start a series of features on Production tips and techniques. They will range from beginning to advanced so if you already know some of this, stay tuned.
Using Your Multi-Track Advantage
The great thing about multi-track recording is that you get multiple chances to get things right. Punch-in and punch-out is the ability to repair or ad to an existing track. This involves being deft enough to get in and out in a space where the finished product sounds like you were never there. Finding your spots before you punch is essential. I will actually practice making the punch in my head before I ever press the record button.
Every machine and format has it's own punch-in/out idiosyncrasies. For instance there is one manufacturer's 24-track analog machine that mutes the audio for just a split second when you're punching into an existing track. So you never know if it worked until you listen back. You will however over time get a feel for your format and machine.
Becoming a Punchmeister
Honing your punch skills is just a matter of practice but there are some tricks you can use, especially on digital machines, that can really help make your job easier:
Most digital machines will give you cross-fade options. This is the ability to choose the amount of time it takes to get from your existing material into the punched in material and back out again. On an ADAT machine the default is about 10ms but you can alter that if need be. I always use the default unless I'm having a problem. For instance on a recent project I had a dilemma that involved a vocal performance. The singer held a note that went out of tune half way through the note. There was another held note that was perfect but the way she got into the note was not good. So I set the crossfade to maximum and as the note started to go out of tune I punched in the other track. With a few tries I found the spot where the punch sounded seamless. Cross-fading works.
The beauty of digital is that you can make a carbon copy without suffering the same generation loss that you would with analog. This way if you are uncertain whether a punch will work, you can make a quick copy of a section of a track and work with that. This way if you goof up the punch irretrievably then you can always refer back to the original. This usually only takes a moment to do and is cheap insurance. When the punch works on the copy you can then seamlessly fold the copy back into the existing track.
If you're dealing with existing tracks and you just want to see if a punch works, use the rehearse button. A rehearsed punch is a non-destructive punch. Once you decide the punch will work then you simply take the machine out of rehearse and make the punch. Even easier is if the machine has an auto-punch mode like the ADAT BRC. The BRC memorizes the last punch you make and stores it in registers 21 and 22. If you rehearse your punch and it works you would then take the machine out of rehearse, put the machine in auto-punch and choose registers 21 and 22 as your in and out point. Then push play and record and watch the machine do your work. If then the punch is still not perfect you can alter the in and out points manually by raising or lowering the numbers, depending on if you want your punch-in/out later or earlier. This is a skill I use all the time when I'm using ADATS and it saves time and is easy to do. (21.7.1998)
Last week we talked about polishing up your tracks using various punch-in/out techniques. This week we get into how to fatten up your tracks using a common pitch shift program.
Where's the Beef?
Sometime there is that certain 'something' that's missing from certain tracks, be it vocals or instruments. It may not call a reverb with a longer decay and you're at a loss for how to make the track speak above the others. A very common pitch shift program that appears on most multi-effects processors may be the ticket. This in combination with a short room or small ambient space can sometime make a track sing.
How it Works
Pitch shift programs operate on a few levels:
Pitch is broken down in two increments, they are often called Course and Fine adjustments. Course is in half steps (semi-tone) usually up to an octave or more. Fine adjustments is broken down to what's called cents, that is 1/100th of a semi-tone. Fine adjustment is indeed a very small amount of pitch and for our purposes this is a good thing. If you do some experimenting you'll soon see that course adjustments give you that mickey mouse on helium kind of sound that never works in a musical sense.
In addition to pitch adjustments you can also adjust the delay of the left and right output of your device in stereo. You'll soon see that we just use a taste of this to give us the sound we're hunting for. The increments are usually given in milliseconds. You can easily visualize the amount of delay you're dialing in by thinking of each foot back you are from your original source is equal to about 1ms of delay. So if you wanted to create an effect that you're listening to something from 20 ft. you'd dial in 20ms of delay.
In addition to pitch change and delay, most programs will give you a feedback control. For our purposes here we won't be using any feedback but experiment with it a bit and listen to what it does to your sound.
The Setup
To make this all happen follow the steps below:
Experiment with the FINE and DELAY adjustments on both sides to get the effect thicker or thinner depending on what you want. In addition, use your effect's return faders to set the level of 'wet' signal in the mix. Sometimes if an effect is heavy-handed it's just that it's too hot in the mix. Use this effect on lead and background vocals or instrumental tracks such as shredding guitars or a sax solo to really give your tracks some edge. Remember this shouldn't have to hit you over the head. Sometime if it's just audible it can add the effect you need without being overbearing. (28.7.1998)
Last week got into some problems I had dealing with MIDI. This week we finally get into some live recording.
Here We Go!
I had some genuine reservations about recording in this environment. I explained earlier that it is a school bandroom and although it followed the rules of non-parallel surfaces well it was very live. We noticed this right away when I tried to do a live hi-hat overdub in conjunction with some cymbals miked with two overhead mikes. The hi-hat leakage was extremely ambient and really out of control. So it was time to fix up the room. Luckily we had about 35 panels of Sonex foam laying around which we tacked up around the room on many of the open walls. I also drew up some plans for some cheap gobos that we'd use around the drums and later for the other overdubs we'd do. The plan was as follows.
The pieces of plywood are hinged together then the carpet is stapled down to one side. After that is secure you put on the L-braces near the ends on the floor for stability. Next put on the handles and voila` you have a simple gobo.
The Sessions
We put up the gobos and along with some that I brought from my own studio they made a nice little 'booth' around the drum kit. It tamed down the room considerably and made for some nice drum sessions. We recorded the bass and drums together for the bed tracks. Budget didn't allow involving other players at this point. The trade-off is that you don't get input from all the players at once but you save a lot of money by not having to use a larger studio and pay for the players to fly in from out of town. Our plan was to involve as many out-of-town people as possible to keep the project from sounding 'local.' As you'll see and hear in the coming weeks, this worked rather well. The bass and drums for all the tunes were laid over a three day period and went off with only minor problems.
The Next Step
My next consideration was to prepare tapes for our trip to Los Angeles. The studios we were going to be working at only had two ADATs at most. Wanting to give the players as many tracks as they'd need I'd have to consolidate our first sessions to one work tape and leave the second machine open for overdubs. I mixed the drums down to stereo and put them over to a work tape that contained the bass and scratch guitar and scratch vocals. I then formatted tapes for the trip. These included blank tapes designated as guitar reels and keyboard reels. Due to the fact that our mix studio, the only Neve V-Series in town, did not have 20-bit machines and it was going to cost a considerable amount to rent some I've re-thought my original 'all 20-bit' project scenario. I've opted to just put the live drums and vocals on 20-bit machines and go with 16-bit conversion for the guitar, keyboard and other overdubbed tracks. This is a bit of a disappointment for me because I really like the sound of the new machines but circumstances have forced me into a corner. This kind of stuff is what goes on in a project where you're trying to get the best out of the least, it's making decisions based on the realities that are tempering your original concept. Next week I'll cover our trip to the coast and how I coordinated the work tapes as we went. (17.11.1998)
Last week I talked about professionalism and making submixed tapes for the upcoming vocal sessions. This week we get into fixing some parts with Pro Tools, flying in background vocals and how sickness has pushed us back in our schedule.
Repair and Conquer
Because of the nature of the project (recording most parts as separate pieces) some parts didn't gel at all times with the track. So the producer wanted to test the feasibility of fixing some of the parts in Pro-Tools. At first he wanted to move individual drums but I put a stop to that idea because of the nature of live recorded drums. You set up many mics on a drum kit and leakage is part of what makes it sound live. To try to move one of the miked drums around in time would be a large mistake because the leaked drum hits would still be in its original spot in time. So, we opted to listen and see what else could be moved to help the groove. It turned out that the guitar part was a bit off only in a few spots but that was enough to take your ear away from the groove.
Because we only had to tweak one track, I put a submix of the song (minus the guitar) to two tracks of Pro Tools. At the same time I flew the guitar onto the computer using the digital ADAT Bridge made by Digidesign. This transfers the signal digitally locked sample accurate and is the best way to fly. Then we looked and listened to the guitar part and I made minor adjustments to the track in spots to clean it up. This worked well in spots and not in others. On the rebound back to the ADAT I only punched the parts into the master track that we tweaked. This way I was assured the original track maintained it's integrity except for a very few fixes.
Flying Background Vocals
A DAW can also be used to make your background vocal tracks sound very consistent and save you in studio recording time. We recorded two days of background vocals but when we did we only recorded the repeating choruses once. Then at a later time we went in and put the parts into Pro Tools and moved them to the other choruses we didn't record. This is a very common trick and I saw Babyface do it very effectively on some sessions I assisted on. They actually used machine offsets to accomplish it but the outcome is the same. The technique renders very consistent backgrounds and the ability to get more done in the original sessions because you're not wearing out your singers.
Inside Scoop
The singer caught a bad cold when we were in LA and she hasn't been able to shake it. This has forced us to move the mix date back for a second time. In the meantime we're doing more overdubs and trying to keep the pace of the project up. Stay tuned for more interesting developments. I promise you'll not be bored in weeks to come. (19.1.1999)
Last week we got into some more recording tricks involving using a DAW to repair a groove and move parts around. This week I get into background vocal recording techniques.
Background Vocals
In preparation for lead vocals we recorded backgrounds over a period of three sessions. There was some controversy about this as the singer at first didn't want to be restricted by any background parts when she sang her leads. She wanted free reign over the music. She had a valid point and there is no 'right' way to do this. I've worked on projects where the back vocals were laid after and before. It's her preference. However as the project has gotten longer and more expensive than anticipated she later changed her mind and we scheduled the sessions before the lead vocals were to be recorded.
The sessions were well organized, the producer is a very good singer and he planned out some parts for all the songs. The plan was to use himself and another great local female singer that I knew very well. The combination was awesome. They both can morph their voices into various textures and timbres and that yielded some very nice parts. If anything we had too much going on with backgrounds on every song, however that can always be weeded out or de-accentuated later on in the mix. Better to have more than you need than to later say........awwww! I wish we'd have done this or that.
The Layout
Backgrounds can be tricky because you can paint yourself into a corner if you lay down the parts in an inflexible manner. For instance doubling some parts and not others will make your parts center heavy and could possibly mask the lead vocal. I always like to lay backgrounds in pairs. This way I can pan them off center and still have them balanced. There are several ways to do this. You can split up parts as separate pitches and double them. So you'd have both (or however many singers you have) singers sing the same note on one track then double it. This could be the bottom note of a three part chord. Then move onto the second and then third part doubling each one. This would be six tracks of vocals all broken down to separate parts. This way you can always mix the parts in perfect balance later rather than relying in the singers to keep the perfect blend from part to part.
This time we laid the first part as a doubled two-part harmony. Then we laid two other parts in the fashion described above. This gave me four parts over six tracks. Because of our one ADAT situation this was ideal as it left me two tracks left for step out parts and extras.
Overlaps
Sometime you'll have the end of a chorus overlapping another part that's coming in on the next section. I had this very situation happen and didn't have the tracks to cover two doubled overlaps. What I did was to lay both parts in separate parts of the song. For instance I laid the first overlapping part on the end of B Section One and then laid the part it was going to collide with at the beginning of Chorus Two. This way the parts would never meet in real time. Later on however I had to put all the parts into Pro Tools and make them all work together. I had two overlapping parts each with six tracks. To save tracks I then put them all onto separate Pro Tools tracks and cross-faded them perfectly. Then I laid all the parts back to my background vocal tape and had essentially 12 overlapping parts represented on 6 tracks. You can see how having a DAW is very important in getting the most done with the least resources. It's getting so cheap now to do this on a home computer that it's really something to consider even if your studio is ADAT or DA-88 based.
Next week see how I made the parts sound different on different songs by using some very simple techniques. (26.1.1999)
Last week I re-capped the recent NAMM show in Los Angeles for you. This week we get into more vocal production techniques.
Frosting
Chocolate cake just wouldn't be chocolate cake without frosting. Somehow it just tops it off nicely. That goes for recording too. Just having your signal path together, although REALLY important, is not enough. How you build your tracks, your 'frosting' so to speak, is what makes it special. Working with background vocalists can be a challenge. Keeping the blend as we've talked about in earlier features is very important. There are also some tricks you can use to make a group sound a bit thicker and you can change the timbre from section to section or song to song.
Pitch Shifting
Most multi-track recorders will let you do some kind of pitch shifting. I often use this to change the timbre of doubles when I'm recording. As we've talked about, arranging your tracks in doubles makes for a nice balance and leaves a hole in the middle of your mix for your lead vocal. What I do on the second pass of a unison double is to pitch the machine either up or down about 10 cents or so. Pitch shifters divide pitch into two adjustments. Course and fine. Course is incremented in half-steps (also called a semi-tone). Like frets on a guitar. The fine adjustment is arranged in cents or 1/100th of a half-step. When you pitch the vocal up on record and then back down on playback it makes the vocal sound a bit deeper but not enough that it's annoying. Especially when it's mixed with an original non-pitch shifted note. If you pitch shift the vocal down on record and back up on playback it makes the vocal sound higher. The overall effect is, for lack of a better term, darker and brighter. To my ear when you pitch up on record it darkens it a bit, and when you pitch down on record it brightens it.
I recently used this effect on a song where the artist wanted a very large sounding background vocal section. So I pitch shifted passes two and three of a three pass part. By pitching down and then up, it layered the timbres and made it sound like a bigger group. It's a misconception to think that simply doubling something will make it sound bigger. The problem is that if the singers are too close in pitch to the original you'll get phase shift and it will result in a smaller sound. When you alter the timbre you help this quite a bit. (9.2.1999)
Last week we talked about drum and vocal placement in a mix. This week we have a guest article on drum mixing.
More Mix Ideas
I received this email a week or two back. I thought it was so good that I'm going to let it speak for itself. Bob Dennis from the Recording Institute of Detroit has a well organized view of drum mixing. Read on:
Kevin,
I wanted to let you know I really like some of your mixing articles. I want to let you know about a technique for explaining the mix of live drums that I developed after thousands of students and decades of teaching that helps new students keep the drum kit elements in balance. The following is from a two page guide on getting a mix used in our Basic Classes, using the 02R. [By the way we have the students mix with audience perspective - high hat on the right]
The key is to have the student listen to the 'ambiance' as the drums are being mixed (without additional reverb) and is contained in the 'hints.' Feel free to reference, post or otherwise use the data:
Drum Mix
Keep up your good work Kevin[!]
[--]Bob Dennis (23.5.1999)
Last week we had a guest article on drum mixing. This week we talk about the tools needed to polish the rough mix to perfection.
Trust Your Ears
It may seem fruitless and boring to listen to a single piece of music for hours on end, but this is really the only way that you can get the puzzle of a mix to make sense. A recorded track is very much like a puzzle. It presents problems, surprises, satisfaction, frustration and anger. Your emotions run the gamut. As in life, some puzzles are easy, others seemingly unsolvable. I guarantee that if you learn to trust your ears, they will lead you to some kind of final conclusion. Last week we talked about assessing the different ingredients in your track and deciding if they work together. Then using the tools at your disposal to make them fit. The main tools are:
Level and Panning
We talked at length about level in the past weeks. It is your first attempt at making the puzzle fit together and it works hand-in-hand with panning. Getting good at placing instruments in perspective with each other only comes with practice. The more roughs you do, the better you get at hearing these relationships. When I listen to finished products on CDs that I buy, I'm constantly listening to relationships and how the engineer placed the ingredients. You have to be able to focus and de-construct the mix. Isolate time-based effects from panning and level, compression from EQ. The more you do this yourself the more you'll be able to develop your ears and hear how others are doing what they do.
Masking is the phenomenon by which one sound will be covered up by a louder sound residing closely in frequency. Setting levels and panning is your first line of defense against masking. Getting this right can mean setting levels that are balanced in the smallest of increments. It's not uncommon to get your mix balanced and have one or two moves topple your house of cards. You'll find that the closer you focus and fine-tune the mix, the more sensitive you become to others suggesting moves. This doesn't mean you should be unmoving to other's suggestions, but be judicious in your tweaking. Think of the mix as a living fragile thing that can easily be upset or destroyed by the smallest change. This may sound strange if you're not accustomed to mixing over long periods, but when you do it more and more you'll see what I'm saying strikes a familiar chord. Automation is a tool you'll use later down the road to make your mix come to life, at this point it's too soon to use it but we will be getting into this in depth later on, stay tuned.
Be sure to check out the June issue of PAR, there is a nice feature on 5.1 system setup and some nice reviews on some very slick gear. The new Audio Media has a nice feature on Plug-in Mania that's also worth reading also. (31.5.1999)
Last week we talked about level and panning and the role it played in mixing. This week we study EQ and Compression.
Polishing Plus
After you get all the tracks up in the mix (minus the lead and background vocals for now) it's time to see what works and what needs to be moved around. There's no mix on the planet that's not going to need some tucking and bobbing to make it work. This is where automation comes in very handy. (by the way, check out the review of the Soundcraft Spirit 328 digital automated console in the upcoming July issue of PAR) We'll be covering both situations, automated and not for this series.
What I'm talking about is building-in mix dynamics where they're needed. In a beautiful world, all tracks would rise and fall tastefully when needed. This gives the piece a human feel and effects us on many levels as listeners, especially emotionally. However, with modern multi-tracking, MIDI and other things that tend to separate musical performances in time, it's often impossible to build dynamics during a performance. How could you as a player react to the horn section when the horn section isn't scheduled to record til after you lay down your tracks? This is where the engineer puts on his listener's hat and builds in the necessary dynamics. But we're getting a bit ahead of ourselves here. Before we get into fader moves let's discuss EQ and compression, the two items that will let our tracks compete with others and sit in a place where they can be heard.
EQ
EQ stands for equalization. As you know EQ comes in a few different forms. Getting the hang of when to use it and when to leave things alone only comes with learning to trust your ears. What you should try to cultivate is frequency sensitivity. The best way to do this is to mix time and time again. Throw up quick mixes and listen to them dry with just panning and fader levels. Get to know what is covering up what and what is working. To hear what is working listen to your favorite CDs, then listen to your mix (hopefully in a similar style). Critique your own mix against the finished product. This is brutal because they've had the benefits of mastering and hours of tweaking, but it's very revealing and good ear-training. Once you target an area then try to fix things up a bit.
For instance, let's say that you find that your bass is non-descript and total mud has occupied the bottom end of your mix. First, pull some things down a bit or out completely to see if it helps. It could be that your problem could be solved by changing levels. Once you trim and tuck a bit, compare again and see if there's improvement. Once you mess with levels and perhaps panning, then get into some EQ. If it's muddy try taking some low end out of an instrument or two. Then compare once again and see if you can hear a difference. Is your mix getting closer or farther away from the model? In this way you can really go to school on pro mixes and try to get your own ears tuned into what the pros are doing. Do this ten times with your mixes and finished CDs, and see how you start to listen differently to all music.
Compression
Getting to understand what compression sounds like is another ear-training exercise. You'll need a compressor and some tweakable tracks already on tape. Start with the compressor set at Zero threshold, 3:1 compression and unity gain at the output. Pick a few different tracks for this exercise. Something like a vocal and then something with some transients like a snare drum. Take the threshold and move it into the minus area (increasing the amount of signal being compressed) and hear what it does. Conversely, return the threshold to zero, then take the ratio and crank it up and hear what that sounds like. Put on your favorite records and see if you can spot the instruments that sound similar to what you heard. Get used to 'hearing' compression on those tracks. We'll get deeper into EQ and compression as the series goes on.
Be sure to check out the interviews with engineers Nathaniel Kunkel (p. 42) and John Gass (p. 46) in the June issue of EQ magazine. (6.6.1999)
What is Phantom Power?
I had a question this last week from someone who was wondering if having the global phantom power switch 'on' on his console would damage any of his non-phantom powered microphones. We'll get into that in a moment, but first a bit about phantom power. There are two kinds of microphones, condenser and dynamic. Condensers need power to run, dynamic mics do not. Condensers have a built in preamp that needs power and they also have two diaphragms, the front one reacting to the soundwave and just behind that another that's charged, this is called the backplate. It used to be that condensers had their own power supply. Then someone figured out that you could power the mics from the console and run that power down the same cable that carries the audio. Because passive (dynamic) mics would ignore this power, it became known as phantom power. In addition, some direct boxes need phantom power as well. These are called active DIs or Active Direct Boxes.
Where is Phantom Power on my Console?
Not so long ago, phantom power was not a common thing in consumer and smaller consoles. Now EVERYONE has it. The reason is that the prices of condenser microphones has plummeted. For instance, Marshall Electronics has a large diaphragm condenser that retails for $199. On a large studio console, each channel has an individual phantom power button, on less expensive consoles there is usually a global phantom power button powering all the channels at once. The button is labeled 'phantom power' or +48V. Phantom power is +48V DC.
Can Phantom Power Damage my Equipment?
There are a few instances where you shouldn't use phantom power. One is with ribbon mics. A ribbon mic is a type of dynamic microphone. Especially in the older vintage mics, phantom power will fry the element, not a good thing. Newer ribbons are protected against this but it's just a good rule to turn phantom power off when using ribbon mics. This leads to the question: What if I have a global phantom power switch and I want to use a condenser and a ribbon on the same session? It just so happens I found a link that deals with that specific problem. How about regular dynamic mics that don't use a ribbon? It's no problem, you can have phantom off or on and it will be ignored. There is one other situation, that is with older vintage mics such as the AKG C-24, which will not work with phantom power on the line. It has it's own power supply and doesn't like to see DC on the audio line. However, the mics manufactured since the 70's should be just fine.
A quick recap:
Suggested Reading:
Directional Response of Microphones
Microphone Links (5.12.1999)
On my recent trip to Europe I stopped in Denmark to tour Denmark Radio and their unbelievable music production facilities. In addition I stopped by DPA Microphones and talked to Morten Střve about recording the voice. He offered me the use of a paper he and engineer Gary Baldassari had written on the topic. The text follows:
Frontal Close Placement
The most common method of recording a talking head for any purpose is the direct on axis close proximity placement technique. Producers commonly call this "in your face". It has a number of advantages, which are; intimate sound, good articulation of consonants, up front or leading sound, and proximity warmth. It also has a number of disadvantages, which are; the need to de-ess, plosive popping, the lack of depth, and lack of natural room tone.
Exactly how close the mic is to the mouth should be set for each speaking person. Listen for the balance of attributes verses disadvantages and move the mic accordingly. The starting point can be about 4" from the mouth directly on axis. You may even angle it by up to 90 to help smooth out the offending sound component. The microphone design must be very clear in it's off axis response for this to work. Have your assistant move the mic in and out from the voice, about 2" to 6" while the speaker is rehearsing and listen for the proximity warmth boost as it balances to consonant brightness. The pop filter should always be employed when close miking the mouth.
Frontal Loose Placement
A less common technique is the loose placement in front of the mouth. Most microphones cannot be used this way due to the unevenness of the off axis response. However a microphone with smooth off axis response can excel at this placement technique if the recording room is of a certain acoustic merit. The first advantage, if you can learn to use it in your recording, is a natural room tone. The balance between voice and room is set by the distance to the mouth and the placement of the speaker in the room. Each room has its good spots and we hope you can find your own in your room. Listen for a short (0.9 ms or less) reverberant quality. A good starting point for this technique is around 12" from the mouth. By working with your assistant move the mic in and out while the speaker is rehearsing and listen to the voice to room tonal balance. Be careful not to get too roomy because it is hard to reduce later. By getting a little room tone in with the voice a more natural and comparatively rare sound will emerge. This technique gives natural depth of narration and applies to scenes where the talking head is not 'in your face.' You should notice that the need to de-ess and filter at low frequencies is reduced. The proximity warmth is replaced by natural room warmth, which is again more rare in today's recording. The recorded natural depth has the power to draw the listener into the recording rather than blow them back in their seats. This adds another trick to your engineering collection.
Top Head Placement
Sometimes the direct on axis techniques of close and loose do not produce the desired effects. This is when creative recording teams start to discover new ground. First, it requires a microphone who's off axis response is extremely clear. By having the assistant move the microphone from the nasal area up, a different blend of 'direct to room tone' can be discovered. If the speaking head is very breathy and / or pops a lot of plosives or has a very strong 's' this 'high on the head' technique should be tried. Also if the speaker is very diaphragmatic is their speaking technique and produces too much warmth from proximity effect this should be tried. The human head is a nasal resonator; try pointing the direct axis of the microphone at the nasal cavity, just above the eyebrow. While the speaker is rehearsing change the angle from direct on axis to 45 down and even 45 up. You may even point it over the head, you won't know what can work if you don't try. Unstick yourself from the belief that there is only one way to record a speaking voice, and that is with the microphone pointed straight at the mouth. If the microphone is of a certain quality level with respect to off axis response a whole new vista can be dissevered and used in your daily technique. Sometimes the mic can wind up over the head pointed down and away from the speaking voice.
Lower Chest Placement
Still another technique that can be learned is the diaphragmatic placement. This style of placement cannot be used easily if there is a standard music stand involved. The reason is; the pointing the microphone at the chest cavity will be interfered with by the music stand itself and cause reflections from the music stand to smear the voice. Of course high tech anti resonant or mesh music stands eliminate this problem. If the script is one or two pages or memorized this should be tried. What it yields is; natural diaphragmatic warmth. Start with the mic about 12" from the mouth, low and at the centre of the chest cavity. Try angling it up and down 45 while the talking head is rehearsing. Listen for the balance of articulation in the consonants to the lower mid frequency roll that the human chest cavity produces. You usually can find a very 'ballsy' sound that is again different from the 'in your face' sound most engineers discover and produce. One good reason to use this technique is if the speaker has an extremely strong 's' or really pops or is very nasal or honky.
Text by Gary Baldassari/Morten Střve
Morten is co-founder of DPA
microphones (formerly Brüel & Kjćr). Gary Baldassari
is a freelance engineer and often works with Morten on various projects.
One being the recording of a space shuttle launch at NASA in Florida for
the Telarc label.
(27.2.2000)
Dynamic signal processing refers to audio gear that performs compression
or gating. Think of it as any hardware device or plug-in that effects the
volume of your track. Some popular names of dynamics manufacturers you might
recognize are Joe Meek, Drawmer, dbx and Behringer.
A gate works by eliminating the track noise where there is no recorded material on tape or HD (this is especially effective on high transient recording
material such as drum hits and the like). A compressor effects volume by
minimizing dynamic range, effectively shrinking the difference between the
peaks and valleys on the track. Essentially a gate helps with noise reduction
and a compressor
helps manage volume and lets a track that is very dynamic, 'sit'
in the mix (see the figure below).
In order to cover the topic in more depth. I'm breaking this series into two features. This week we'll dig into how a gate works, how and when you should use it and how to set it up. Next week we'll get into compressors.
Questions
Should I gate toms, kick and snare to tape when I record live drums?
First off a disclaimer, the following views are my own that I learned from working with some of the best engineers in the business. Certainly there are other opinions out there but my techniques work for me and the many others before me who use them regularly.
I'll tell you a story that sums up my first and last attempt at gating toms to tape. I was working with a famous recording engineer and we were talking about an upcoming recording session where I would be recording live drums. I noticed he had used gates on the toms in his session (I was assisting him on this particular session) and I wrote down all his settings in my notebook and asked him questions about technique. He basically said he always gated to tape and had little or no problem. The next week I had my own session and my gating experience was a nightmare. I set the gates to optimum during rehearsal and it was working well, then during THE take, the drummer inexplicably changed his style, as drummers sometime do, and went for a much softer approach on the toms. Of course everyone loved the take but for me it was awful. Half the tom hits never got to tape because my gates were setup for the rehearsal performance, which is not what was on tape at this point.
Gates work best on high transient material, meaning high peaks and low valleys. They are great for drums and some percussion. Where they don't work well is with sustained instruments and voices that slowly fall off in volume and in transient material with a lot of repetitive hits. You can see in the drawing below what you gain by gating a track. Everything below the threshold is turned off, including the noise floor. When the track raises above the threshold you can see that everything is in but the noise floor is masked by the track itself.
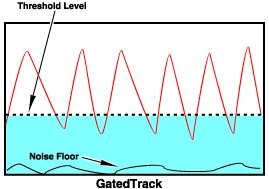
Setting up a Gate
Knowing a good starting point when it comes to setting up a gate is very important in getting a handle on the process. Once you are at a point where the gate is passing signal and you know it's working, then you can make fine adjustments. What you're trying for is to have the gate do it's job but not be heard. This means no clipped ends or beginnings or level drops during a performance. Use the guide below to set your gate at the start of a session, you may not have all the adjustments mentioned but whatever you do have can be set according to the guide:
The reason these preliminary settings work is because the gate will start passing audio immediately. This tells you that you have hooked it up correctly (that is across the channel insert or across the entire audio path, NOT through an auxiliary) and that you are able to make it do it's work. Once you know that you can then fine tune in the following way.
Fine Tuning
Filters If you have filters then you have the ability to effect the frequency of the input. You can use the filters to eliminate any sound that's making the gate open or close where you don't want it to. For instance, if you're gating a snare drum the cymbals or hi-hat could be effecting the gate. With the filters you can reduce the amount of high frequency (where the cymbals are) that is getting to the open/close circuit and isolate the snare. This does not effect the actual audio but only what the gate is hearing. A great tool!
Threshold - From the zero position you can move the threshold either up or down to make the gate work properly. For instance, if your gate is staying open too much, raise the threshold so only those peaks that you want to let through are triggering the gate. If your gate is not opening for every hit, then lower the threshold (negative numbers) so more of the hits are triggering the gate.
Attack - My basic rule is to leave the attack at the shortest possible setting at all times. I always use the threshold to effect how the gate opens not the attack. Only in very special circumstances would you go with a lazy attack.
Release - The release is completely dependant on your program material. For instance, if you are gating a reverb and you want to capture the full tail and not have it sound chopped off, a slow release will give you a more natural sound. For drums though you want a quick release but not so quick as to cut off the natural decay of the hit. Using your ears is essential for this setting.
Hold - The hold setting allows you extend the sustain of a gate for a set amount of time. For instance, if you had a speaker on tape (spoken word), you could effectively cut the signal before and after the speaker by using the attack and release. By choosing a longer hold setting, you could keep the gate from closing in the longer pauses between words thus achieving a more natural sound.
Ducking Explained
An advanced function that gates sometime have is called ducking. Ducking does exactly the opposite of a gate. Where a gate will open when signal passes the threshold and close when the signal falls below the threshold, a ducker will open when the signal falls below the threshold and close when the signal goes above the threshold. The best way I can illustrate this is to give you the following problem and solution.
Lets say you have one track that has kick drum and snare drum printed together. One way you could get the tracks onto separate faders for the mix (so you can control level separately and add different EQ and effects to each) would be to simply patch the one track to two faders and use an automation system to mute one track when the other track was playing and vice versa. This would be laborious but it would work. A quicker way to do it would be to patch the same track to two faders and patch a gate with a ducking function across both channels. You'd set up both gates as suggested on page two of this feature but choose EXTERNAL as the key source. Then into the key input of the gate of the kick drum gate you'd patch a mult of the snare signal and into the key input of the gate on the snare drum you'd patch a mult of the kick drum. Set both gates to ducking and the kick drum gate will close when the snare plays and then the snare channel will close when the kick plays. Essentially you're using the snare to shut off the kick and the kick to shut off the snare.
The drawing below shows that everything in the blue area is "off", and everything below is on. You can see that this essentially mutes whatever material is above the threshold.
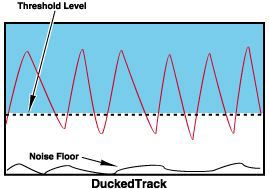
By using the techniques and tips in this feature, you can become an expert at gating and ducking. Stay tuned next week for tips and setup of compressors. (25.10.2000)
Last week we all got to unofficially vote on the Grammy Award nominations. This week I take you inside a tracking session I did here in Nashville.
A few months ago I had the opportunity to engineer a tracking session. (Tracking is the initial lay down of tracks for a recording project). The goal was to record 4 songs in two 3-hour sessions. We ended up getting 6 songs done but it wasn't easy. The main problem I had was that the console was substandard. In fact, the house engineer pulled me aside and suggested I DON'T use the mic preamps or EQ in the console. (Oh Great! I thought) He did say that they had 8 external mic preamps that I could use. However I had to record a full drum kit, acoustic piano, acoustic guitar, electric guitar, upright bass, vocals and electric bass. No matter how you do the math I needed more gear.
The First Hurdle
Because of the situation with the console I ended up renting some necessary gear before the musicians arrived. The stack pictured below is from top to bottom:
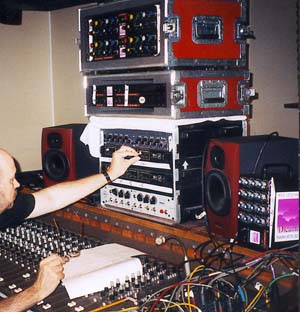
To the right of the stack you can see four channels of API 550b EQ. I also had a Millennia STT-1 mic preamp/EQ/Compressor to help with the chores. The monitors were Tannoy passive Reveals which I like and are inexpensive. The point of this all is that sometime you need to beg, borrow or rent other gear for a session.
The path from the microphone went directly into the preamps, then some went to EQs and then to tape. The console was just used to monitor from the tape machine which was a Studer A-800 analog 24-track machine. When you keep your path as clean as possible to your recorder, you greatly benefit by keeping the noise floor as low as possible.
To see some pictures I took of my miking setups for the other instruments read on. (3.1.2001)
The drums sat in a separate iso room that had simple french doors. The ceiling was low and as you can see there was a curtain across the back. This made the room fairly dead which was good. Notice how the overheads are level with each other. I take great pains getting the mics razor leveled. In hindsight I should have brought them down a bit (the overheads look a bit high) but the tracks came out sounding great so perhaps not. Experiment with placement and always use your ear as the ultimate guide.
HOT TIP: To get the overhead mics perfectly level, view them at such an angle that you can line them up with the joint where the wall meets the ceiling.
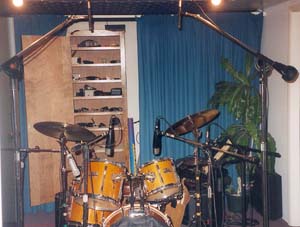
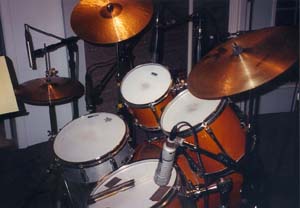
Notice the placement of the mics, they are about 1-2" off of the surface pointing towards the head. There is no rolloff or pads on these mics. They are dynamic mics and can take plenty of level. Notice how each mic is out of the way of the drummer, I'll always ask the player if the mics are ok and if not I'll readjust them. Be sure to crank down hard on the stand booms, heavy mics like these have a tendency to drift and can end up touching the head during the take.
HOT TIP: The Sennheiser 421 has a rotary switch near the plug that has the letters M and S at either end of the throw. M stands for music and S stands for Speech. There is a rolloff associated with the S that you don't want, that's for a broadcast application and meant to take away the proximity effect. Always use the M setting when recording music. (3.1.2001)
For the piano I used two AKG 414s placed equidistant over the hammers. The mics were in cardioid pattern with no pad. Always remember that even if a piano has been recently tuned it needs to be tuned before every session. Some studios don't want to go to the expense and will tell you it was 'just tuned,' however I've been on sessions where the player's technique was such that the piano went out in the middle of a session necessitating it being tuned again. There's just something that sounds wrong when a piano is out of tune, sometime you can't quite put your finger on it but it does effect the performance of other players, singers and the feel of the track. By the way, this isn't the only way to mic a piano. There are many creative ways to mike an acoustic piano that will yield great results.

I had the guitar amp in a small room next to the player. He liked to be in the same room as his amp but that was also the room where the upright bass and acoustic guitar was. I talked him into putting the amp next to him with the door slightly open. This gave me the isolation I needed and made him happy. A lot of times a session is a compromise, you just hope that you get players willing to play ball. The mic I used on the cabinet was a Neumann KM84. You can see it was right up but not touching the grill cloth. The placement of the mic is important because there are a lot of strange phase irregularities going on around a speaker. (3.1.2001)
Last week we talked about Demystifying the De-Esser. This week we discuss frequencies and how they relate to EQ.
I often get questions from readers complaining of muddy mixes or tracks that just don't sound like their favorite CDs. Unless it's something drastic, such as overall track distortion, it's often more than one factor that makes a mix or recorded track sound good or bad.
A Great Studio Tool
EQ can be a major help in clearing the mud out of a mix or adding the sheen that we all have grown used to in commercial CDs. What I've found that works very well is reverse thinking when it comes to EQ. In other words, it's not always about what you need to add to a sound to make it sparkle or stand out but what you need to remove from something else. Apart from EQ it can often be a matter of level, for instance: Is a synth pad obliterating the space in your mix that the lead vocal should occupy? When simpler techniques fail EQ can often come to the rescue.
On a basic level, knowing what frequency you're hunting for when EQ'ing can save you a lot of time and help you in sculpting the sound you want. I've constructed the handy chart below to help you in this task. You'll see the keyboard off to the left with corresponding frequencies. The keys correspond to a value in Hertz that has been rounded to the nearest whole number. In addition you'll see a list of instruments and where they fall in this range. These are basic ranges, for instance for the drums the frequency would depend on how they are tuned.

Not the Whole Picture
Although this map can tell you a lot about the frequencies in the range of the piano, it doesn't say a lot about the complexities within a particular instrument's harmonic content. For instance, a guitar might share a lot of the same frequencies as the piano but you'd treat both of them differently in a mix because of the natural tendencies of each instrument. Also, this chart doesn't address frequencies above 4186Hz. There is a lot going on in the upper frequencies having to do with presence, clarity and 'air.' This range is often overdone and it is best to be conservative in this area as well as with all EQ.
Kits are changed, heads are changed, cymbals are changed, heads are taped up, heads are un-taped, mics are selected, mics are changed, the kit is surrounded with mirrors, the kit is placed on wood, head damping devices are used, mini pads are cut in half and placed on heads, two kick drums are taped together (end-to-end), and after all these variations are tested, the whole process may begin again with yet another kit, or worse yet, another drummer.
The Rx
So without any further delay kids, here's my prescription for a great drum sound you can get in a (kind of average, these days) home studio: The imaginary studio consists of a console with at least eight inputs (let's hope it's a Mackie or something that has good head room and nice sounding equalizers. Let's also assume you've got at least eight tracks (although you won't need them all for this set-up) on your tape deck and seven decent microphones. My recommendations for drum mics on a budget are 4) Senheiser MD 421's, 1) Shure 57, and 2) Shure SM 81's. There are other more expensive mics that I would use in a pro studio, but I'm not going to mention them because this article assumes you're broke. If you had any money, you wouldn't be reading the crap that I write, you'd be reading the Wall Street Journal.
Rule of Thumb
If the mic has a 'pad' switch, use it when recording drums. Always better to pad at the mic than the console.
The Killer Kick
Mic the kick drum with a Senheiser 421, but only after throwing a sandbag in the drum to weigh it down. Let the sandbag touch the head (that the beater hits) just enough to dampen out any obnoxious overtones, but not the good, natural sounding ones. The mic should be placed about half way in to the drum itself and pointing at the beater. If you bring the mic in from the right side of the drum and angle it at the beater you will be avoiding leakage from the snare drum which is a good thing to do. You can experiment with the depth of the mic, but always keep the mic pointed at the drummer's shin bone on the leg that controls the hi-hat and in line with the beater.
The Sumptuous Snare
For the snare drum, it's always a safe and highly effective choice to use the venerable Shure SM57. Bring it in from the audience side of the kit and give it a 45 to 60 degree angle with the capsule about an inch or two above the head. Again, the farther out it is from the head, the roomier the sound, but the more potential you have for phase problems. By the way, it's always a good idea to point the mic at the drummer's crotch - not that it's a particularly good sounding part of the anatomy, but because it's away from the hi-hat and any potential leakage problems.
Thunderous Toms
Mic all three toms with the 421's set at a 45 degree (or there abouts) angle to the drum head with the end of the mic (the capsule end) pointing at an imaginary spot about 2" past the rim nearest you as you place the mic (this is assuming you're working from the audience side of the kit). The floor tom mic can be placed a little close to the center of the head, but not too close. The distance of the mic from the actual head should range between one inch and six inches depending on how 'roomy' you like your drums to sound. Once again, the further the mics are from the drums, the roomier the sound, but you'll have to pay more attention to possible phase cancellation problems.
Overheads Easy
For the overheads use the SM 81's with the roll-off kicked in. Place the mics about 16 inches over the cymbals' centers and towed out at about 45 degrees. That will give better separation, and also reduce the amount of low end from the toms that is picked up in the cymbal mics. Who needs bottom end on their cymbals?! Please note that I haven't mentioned a hi-hat mic. That's because in most cases, you don't really need one. You'll get enough hi-ht bleeding in to the other mics. If you have the luxury of plenty of inputs and tracks, go ahead and mic the hi-hat, but chances are you won't need to.
And now here's the quick and dirty run- down on equalization and track assignments:
Kick drum - Assign it to track #2, and give it +2@ 100HZ for bottom, -2@300 - 500HZ for posterity, and +2@2.5 K for added attack. Set your mic pre to somewhere in the neighborhood of 12 o'clock (of course this will depend on your console's individual mic pre's). Your input levels should be peaking around -3db VU. Notice the 'VU.' If you're using peak meters, you're on your own. I was raised on VU's, and they remain my preference.
Snare drum - Assign it to track #3, and give it +2@100HZ, -2 to -4@300 - 500HZ, and +2@ 5K to8K for more snare and general crispness. Be careful on the top end, too much will make the snare sound thin and paper-like. Set your mic pre to somewhere in the neighborhood of 12 o'clock - possibly lower. Your input levels should be peaking around -2db VU.
Tom-Toms - Assign the high tom to track #4, the mid tom to tracks 4 &5, and the floor tom to track #5. Follow the same guidelines as the snare drum for the equalization. Again, set your mic pres to somewhere in the neighborhood of 12 o'clock or lower. Your input levels should be peaking around -2db VU. Pay special attention the mid tom. Because it's assigned to two tracks simultaneously and appearing down the middle of your monitors, it will generate less level at the meters and in your monitors and should be goosed a little to compensate. Have the drummer do a two-stroke on each tom in succession and you should hear a nice even 'tacka - tacka - tacka' moving from one side to the other (I usually pan track #4 full left and track #5 full right).
Overheads - Assign the cymbal over the hi tom to the same track as the hi tom (track #4). That will help keep it in phase. Assign the cymbal on the other side of the kit to the same track as the floor tom (track #5) for the same reason. Cymbal mics usually don't need too much in the way of EQ, but you may want to use the high-pass filter to roll off the bottom end and add just a pinch of top end (around 8 - 10K). Keep the input levels of the cymbals fairly low as they have transients that can fool meters and blow tweeters faster than you can say, 'Oops.' Final Thoughts
Always check your drums in mono. If anything in the kit seems to disappear, then something's out of phase. Be systematic in tracking down the culprit.
If you follow this prescription closely and then, and only then, start to experiment with slight modifications of positions, level and eq, you'll find yourself getting a drum sound that just might sound professional. Of course, individual drummers have drastically different levels of 'feel,' and feel is very important to the sound, sometimes more important than the drums themselves or anything you can do in the control room.
During Michael Laskow's 20-year tenure as an engineer/producer, he worked with Crosby, Stills, Nash and Young, Eric Clapton, Cheap Trick and countless others. He continues to write articles for magazines like Recording and Electronic Musician. He's also the founder of TAXI, an independent A&R company that links record labels with unsigned artists and songwriters.
The ancient art of drum-kit miking is a black art as far as many project studio owners are concerned. Yet, as BENEDICT GRANT explains in the first of this two-part series, there's no need to let the kit beat you...
Many songwriters and home studio engineers lack confidence in their ability to record a drum kit at home or in an untreated room: this has condemned many songs which would have benefited from the live feel of real drums to the metronomic tyranny of the beat box. The reality is that a good live drum sound can be achieved in a small, untreated room, with just a few inexpensive microphones, providing that care is taken with the preparation of the kit and with microphone placement.
Tuning and preparation of the drum kit is a vital first step towards obtaining a good sound: a kit which sounds fine for gigs and rehearsals may show all manner of imperfections under the harsh scrutiny of the studio monitors. Stage one is to eliminate clicks, rattles and buzzes. The bass drum pedal is often a culprit. It must be securely attached to the drum shell, and should be oiled if it squeaks. Any of the metal fixings on the kit which rattle should be tightened or damped with Blu-Tack.
Next, each drum must be tuned by adjusting the tension of its skin. This should be tightened evenly, and you should check by tapping the skin round its perimeter, ensuring that the pitch is constant. Experiment with different tuning pitches on the bass drum: you'll be surprised at how much this can affect the feel of a track. If you're using double-headed toms, ensure that both heads are tuned to the same pitch.
A powerful and well-defined sound is more easily achieved if the bass drum has a hole cut in the front skin. Some drummers cut a small hole, of seven inches or so in diameter. This can make the rest of the skin resonate, so I prefer to cut a much larger hole, leaving just an inch or two of the skin around the perimeter. It is not advisable to remove the front head altogether, because the drum shell would then be subjected to uneven stresses, with the potential for damage and warping.
Any drum which rings or resonates to excess should be damped, by gaffa-taping a small pad of paper tissue or fabric to the drum skin close to the edge. Don't damp a part of the drum that the drummer will want to hit! A cushion or pillow should be placed inside the bottom of the bass drum, about half an inch away from the head, to reduce unwanted resonances. This can be moved into contact with the skin, if required, to damp it further.
The most important parts of the drum kit are the bass and snare drums: both must give clear, positive beats which decay before the next beat if a blurred sound is to be avoided. The sound of the bass drum is also determined by the material of the beater: wood gives a modern, snappy sound; leather and felt produce more of a thud, better suited to a rock style. A 'black dot' drum skin gives a harder, better-defined beat. Try taping a beer mat onto the skin at the point where it is struck in order to obtain a similar effect.
Tuning the snare drum high gives a high, contemporary sound, whereas a lower tuning is more suited to rock music. The lower head should be slightly looser than the batter head. Tuning pitch also determines the decay time for the drum sound, which is longer for a low pitch. For fast tracks, it may be necessary to raise the tuning or increase the damping so that the drum does not resonate from one beat to the next. (This creates a muddy effect.) The snares should be tensioned so that they rattle crisply when they are on and the drum is struck, but do not buzz or rattle in sympathy with any other part of the kit. If necessary, the wires can be damped by applying a little gaffa tape to them, close to the edge of the drum, though inevitably you have to live with some rattle. Using a snare gate can help keep this under control.
Tom-toms often have an excessive ring, which should be damped as described previously, rather than by using the drums' internal dampers, which apply pressure to the rear of the skin and thus affect the tuning.
It's important not to damp the kit excessively -- you want it to sound like the dynamic powerhouse of the band, rather than a lifeless accumulation of soggy cardboard boxes.
The most straightforward way to mic a kit is with a single pair of overhead microphones. This technique gives a very natural sound, with excellent stereo imaging, but it limits the possiblities for adjusting the drum sound during mixdown. I find this technique very effective for jazz and for ambient music. It is least successful for pop and rock.
Start by positioning the microphones at a height of six feet and about five feet distant from the kit, and experiment with moving them further back until a good, well-balanced sound is achieved. If you are working in a room which has a pleasant live sound, try moving the microphones further back, in order to increase the amount of reverb the mics pick up from the room. Listen to the sound with the mics in different positions. Note that it's wise to err on the side of caution and not record a sound which is too reverberant: you can always add more reverb using a digital processor, but it is impossible to reduce the amount of reverb on a recorded sound.
It's best to use condenser mics or high-quality dynamics: Tandy pressure zone microphones (PZMs) make good budget overheads, and can be gaffa-taped to the mic stands. Reasonable results can be obtained with Shure SM57s, which are fine and relatively inexpensive dynamic mics. Almost any condenser mic (AKG C1000, C451, C414) will perform admirably as an overhead. I have used this technique to record drums for a five-piece jazz group, using a Calrec Soundfield stereo microphone as my overhead.
A very worthwhile improvement on this method is to add a third mic for the bass drum. This allows the balance between the bass drum and the rest of the kit to be adjusted during mixdown, and enables the bass drum sound, which often requires processing, to be treated separately. Many bands, including Led Zeppelin and The Beatles, used this setup to good effect.
Most commercial recordings are now made using a multi-microphone setup. Each instrument in the kit has an individual microphone, which allows the balance between individual drums to be adjusted by the engineer, and for each signal to be processed and equalised separately. For this technique to be effective, good separation must be achieved between microphones, so that each picks up the sound from the drum to which it is assigned, with the minimum possible bleed from adjacent drums.
It is not necessary to mic every single drum: bass and snare constitute the powerhouse of the kit and are the most important. The hi-hat bleeds through onto the other mics to such an extent that a separate mic is often redundant, and the cymbals are best picked up on a single pair of overhead microphones.
The bass drum is usually recorded with a dynamic mic. This should be fixed to a short boom stand, and positioned inside the drum about two or three inches from the skin and somewhat off-centre. I incline the mic downwards at about 30 degrees, and pointing away from the floor tom. The AKG D12 and Sennheiser MD421 have been popular choices for decades. A Shure SM57 works well on the bass drum, as does their new Beta 52. I have heard of a PZM being employed, resting on the pillow in the drum. Most condenser microphones will produce a very fine sound but I feel that they are wasted on the bass drum, and I prefer the slightly fatter sound of a large-diaphragm dynamic like a D12. If you do use a condenser mic, switch the attenuator pad in, to prevent the mic distorting with the high sound-pressure level.
The snare drum is one of the most important elements of the kit, and in order to maximise processing options during mixing, it is important to achieve the greatest possible separation. This is difficult because of the snare's proximity to the hi-hat and toms. I place the mic just an inch or two above the batter head, pointing away from the hi-hat, which is always the worst source of overspill. It should not point towards any of the toms, nor should it be located where the drummer is likely to hit it.
I generally choose a dynamic mic such as an SM58 or Beyer 201, both of which are quite directional -- this aids separation. Condensers are equally effective: the AKG C1000, C451/CK1, and Neumann KM84 all perform well, and tend to give a brighter sound than a dynamic.
A condenser mic is most suitable for the crisp, bright sound of the hi-hat. The KM84, C451 and C1000 all perform admirably, as does the AKG C414 for those with heavy wallets. I position the mic about three inches away from the upper cymbal, pointing away from the snare drum in order to maximise separation. A crisp, hissy sound can be achieved by miking the edge of the cymbal, whereas placing the mic closer to the centre produces a more metallic sound, emphasising the click of the stick. It isn't always necessary to mic the hi-hat separately, because it is picked up so clearly by the overheads, as well as spilling over onto the snare mic.
The toms can be miked with most good dynamic or condenser microphones. The SM57 is a popular choice, but I often use AKG C1000s, which give a crisper sound. I position them two or three inches above the skins, angled at about 30 degrees. Toms are rarely subjected to drastic processing, so attaining good separation is not vital. Indeed, a small amount of overspill on the tom mics can help to give a live feel to the recorded sound.
Two overhead mics provide the main sound pickup for the cymbals, as well as picking up sound from all the other instruments in the kit, to give cohesive stereo imaging to the kit as a whole and add some ambience. Condenser mics are best suited to the demanding task of capturing the exceptionally wide frequency range of the cymbals. If you are not constrained by budget, AKG C414s or Neuman U87/89s are splendid. However cheaper mics, such as the AKG C1000, can perform admirably, and I have achieved results I am proud of using PZMs. Overhead mics are generally positioned just behind the drummer, at a height of about six feet, pointing down towards the cymbals.
If your microphone collection does not permit separate miking of the toms, they can usually be picked up adequately on the overheads. In this situation, it's possible to adjust the level balance between the cymbals and toms by adjusting the height of the cymbals, and also by altering the position of the overheads, so that the mics pick up relatively more or less of the tom sound, relative to the cymbals.
Where the drums are being recorded in a reverberant, live-sounding room, experiment with placing two more microphones at a distance from the kit to capture the ambience of the room. PZMs fixed to the wall can be very effective.
There are many percussion instruments which do not form part of a drum kit, but which will sometimes be encountered in the studio. Tuned percussion instruments such as xylophones, glockenspiels, marimbas and tubular bells should be recorded from above, preferably using a good condenser mic (AKG C414 or C1000, for example). Because the sound does not emanate from one point, but from the individual bars or tubes of the instrument, it is important to listen to the sound and take care to place the microphone in a position where it picks up the sound evenly. If a single microphone is used, try positioning it between 18 inches and three feet away from the bars. Where the instrument features prominently in the song, I tend to record in stereo, with two microphones spaced slightly apart. A similar technique can be applied to any other instrument which 'tinkles' or has a significant high-frequency content, such as bell tree, triangle, or rainstick. I find, when recording bass percussion instruments, including timpani, that a fuller, more rounded sound can be captured if the mics are placed at a distance of five feet or more. A good dynamic mic, such as a Sennheiser MD441, may be used instead of a condenser.
It's important to realise that every drum kit is different and sounds different, and that there is no single correct technique for miking up. The suggestions in this article are the result of many years of practice, experimentation, and chatting with other engineers, as well as my own taste. Next month, in the concluding part of this short series, I'll be moving on to recording and mixing the well-miked kit. Meanwhile, you should feel free to experiment with the resources you have available, to get the most appropriate sound for the track you're recording.
• Many drum shops sell Moon Gel, a sticky substance not unlike chewing gum, which is extremely effective for damping drum skins; you simply tear off a small lump and stick it on the offending skin. It leaves no trace when removed, and can be re-used.
• Make sure that mics and stands are well away from the drummer's strike zones. Also, to avoid unwanted mechanical noise, don't let the mic stands touch the drums or drum stands.
• Try to get the best sound you can by changing mics or moving mics around, before you resort to EQ.
• If there is too much spill from the crash or ride cymbals in the tom-tom mics, try miking the toms from underneath.
• Always evaluate the kit sound with the same drummer as the one you'll be recording. The same kit can sound totally different when played by another drummer.
• Remove boomy resonances from toms by damping them, using small pads of cloth or tissue gaffa-taped to the heads. Lay a pillow inside the bass drum resting gently against the back head.
• If you don't have a dedicated kick drum mic, experiment with what mics you do have, as the chances are that some will do the job noticeably better than others. Try to use mics with similar characteristics on all the toms.
Drums sound best in a bright, reverberant space with lots of hard surfaces: the modern trend is for a very live sound, and many studios have 'live' rooms (often with stone walls) specifically designed for drum recording. Personal experience shows that an empty garage can make an excellent drum room. If you don't have a suitable live room, drums can be recorded just as effectively in a living room, with ambience added using a digital reverb.
Thanks to Steve Kent at Denmark Street Studios for allowing the use of the studio for the photos, and Jackie at the Drum Cellar in Denmark Street for the use of the cymbals.
Published in SOS, December 1997
Although bass drum is rarely the defining element of a song, quite a few classic hits just wouldn't be the same if they had a different kick sound. Try to imagine, for instance, Led Zeppelin's “When the Levee Breaks” with a dull, thuddy, disco-type bass drum. Or at the other extreme, how about the Commodores' “Brick House” with a huge, boomy kick? Clearly, such changes would make either song sound and feel very different.
The fact is that the sound of the kick is often critical to the success of a mix, particularly in rock, dance, and other types of music for which the bass drum plays a foundational role.
But what's the best way to record bass drum? One challenge is the big range of bass-drum sizes that today's engineer is likely to encounter, from tiny 16-inch boppers to 26-inch behemoths. Various tunings, head configurations, and types of heads can also affect how the recording engineer approaches capturing this bottom-dwelling instrument.
In this column, I'll offer some tips and techniques for recording kick drums. Of course, my prescriptions are meant only as guidelines; your own results will necessarily vary depending on the recording space, drum, heads, tuning, muffling, mics, preamps, recording medium, and so on.
MAY I SUGGEST?For obvious reasons, it can be difficult to suggest changes to setups when working with drummers who bring their own kits into your studio. Still, some scenarios may warrant polite intervention from the recording engineer.
A relatively common problem is worn-out or “dead” drum heads. Note that a head can look okay and still be sonically dead. Worn-out heads will almost always lack a strong fundamental tone — a thin, one-dimensional sound coming from an otherwise decent drum should send up a quick warning flag. Another telltale sign is a head that must be tensioned tightly just to produce a tone. That usually means the head has been beaten so long and hard that the material (typically Mylar) has stretched or is pulling loose from the collar.
For engineers who record lots of different bands, it makes sense to have a few new replacement heads on hand. For kick drum, the most common sizes are 20 and 22 inches. One of each size should suffice.
Unwanted noise from kick-drum pedals can also present problems. Though the sound of John Bonham's squeaky pedal may be an endearing feature of some Led Zeppelin songs (at least to Zep heads), the usual goal is a silent pedal. Solo the kick and overhead mics and listen carefully for any squeaks, scrapes, clicks, or other unwanted sounds coming from the pedal. If the pedal is making noise, applying a drop or two of lightweight oil to moving parts — springs, bearings, hinges, or what have you — will usually take care of it.
Finally, a word about attack, the “click” of the beater striking the bass-drum head. For pop-oriented drum tracks, as well as many others, a well-defined attack is an important part of the composite sound of the kick drum. A mushy felt beater is not going to make the job easier. Therefore, you might also consider keeping on hand a hard plastic or wooden beater, which will help emphasize the attack.
LITTLE BOPPERThe jazz kick — think early Elvin Jones — is traditionally a small drum, typically 18 inches in diameter, fitted with single-ply heads front and back, with little or no damping. The heads are often tensioned fairly tautly, which, combined with the lack of damping, can result in the drum sounding more like a low tom than a standard kick. (The playing style adds to the effect: rather than be relegated to timekeeping and low-end syncopation duties, like a rock bass drum, the jazz kick is more an equal voice in the drum kit, often with as much say in accents, rolls, and phrases as the snare and toms.) Some players tame a bit of the resonance with one or more felt strips stretched across the head or heads and secured beneath the hoops; others prefer to leave the drum “wide open.” Either way, the traditional be-bop kick produces a resonant tone, making it quite a different beast from the usual thumpmeister.
Jazz drummers tend to be particular about tuning and the overall sound of their kits, so accuracy of sound capture is usually key. In multimic setups, I have achieved my best results using a high-quality large-diaphragm condenser mic positioned anywhere from six inches to two feet back from the kick drum, with the capsule (in cardioid mode) parallel to and facing the resonant head (see Fig. 1). One of my favorite mics for this application is the Neumann FET U 47; I have also gotten excellent results using my Microtech Gefell M71KMT.
Up to a point, the farther back you position the mic from the kick, the more natural the drum will sound, because the low-frequency sound waves have more time (space) to develop. Because this approach captures not only the sound of the kick drum but the sound of the rest of the kit as well, mic placement is critical. Most importantly, make sure the signal coming from the kick-drum mic blends in well with the other drum-mic signals.
In the case of a jazz kick that is too resonant for the track, a quick and easy fix is leaning a pillow against the resonant head. The larger the pillow is — and the more contact it makes with the head — the more damping will result.
HOLE IN THE FRONTThe double-headed kick drum with a hole or port in the resonant head is popular among drummers in many styles because of its versatility. Generally preferred for pop, rock, and funk, double-headed-with-port kick drums are usually in the 20- to 24-inch range. Often these drums will have batter heads that are double ply (possibly oil filled) or fitted with a semiperforated edge muffler. Depending upon the application, the drummer may have fitted the drum with some form of extra muffling to further damp the heads. Mufflers come in all shapes and sizes, ranging from felt strips to pillows or blankets to purpose-built contraptions. In general, a muffled double-headed kick with a port provides a nice balance of attack and some resonance.
The port opens up (pun intended) some options when it comes to miking the drum, allowing you to position a microphone fully or partially inside the drum or even to use two mics (more on that in a moment). A single-mic setup that has worked well for me has been to place a large-diaphragm, unidirectional dynamic mic — for example, an AKG d12e or EV RE20 — just inside the port and facing the batter head. That gives you the archetypal “basketball bouncing” kick-drum sound, which is often desirable for pop, rock, and funk tracks. As always, small changes in mic positioning can yield very different results, so make sure to experiment. For more attack, you can aim the mic toward, or move it closer to, the point where the beater strikes the head; for more resonance, pull the mic back or aim it more toward the shell of the drum.
The double-headed-with-port kick drum is a good candidate for using two microphones, one inside the drum and the other outside. The internal mic is used primarily to capture the attack transient while the external mic picks up the overall ambient sound of the drum. If you are adding a second mic, it is customary to use a large-diaphragm condenser; however, good results can also be had with other types of microphones, most notably boundary-layer mics such as pressure-zone microphones (PZMs), which can be placed on the floor directly in front of the drum.
When using two microphones, pay particular attention to ensure that the two mics are not significantly out of phase with each other, which can lead to a deterioration of the sound — thinness or hollowness, typically — when the two channels are combined. To check for phase problems, solo the two channels with one fader up and the other down and then listen carefully as you bring up the second fader. Simply put, the sound should get better — fuller, clearer, better defined — not worse. Another way to test for phase problems is to reverse the polarity on one of the mic channels (whether at the preamp or channel strip) and listen for changes in the quality of the sound. Then, choose the polarity configuration that sounds best.
Even when you use just one microphone, the ratio of initial transient to fundamental tone can be modified significantly with compression. If you want more attack, slow down the attack time; if you need more sustain, set a longer release time. One of my favorite units for altering the ratio of transient to fundamental tone is the SPL Transient Designer 4, a unique dynamics processor that allows you to emphasize or smooth the attack and extend or shorten the sustain without introducing other compression characteristics (see Fig. 2). (SPL also offers the Transient Designer 2, a lower-end version of the same processor.)
ONE-HEADED WONDERIf you're after the ultimate in smack and dryness, the single-headed kick is the way to go. Generally, single-headed kick drums are at their best when muffled, typically with a blanket or large pillow resting snugly against the lower portion of the batter head.
On single-headed kicks, a good, if slightly retro, sound can readily be captured with the ubiquitous Sennheiser MD 421 dynamic microphone (see Fig. 3). If you want a sound that's even more bandwidth limited, try deploying a Shure SM57. A condenser microphone can serve up a great kick sound, too, especially if you are looking to emphasize attack. Do some research first, though — not all condensers can handle the high SPLs a kick drum delivers.
Because the drum is open to the studio, you can expect more leakage of the bass drum into the room microphones and other mics used on the kit. There are several ways to get around that. One is to apply a gate to the drum track. However, that is almost always better done during the mixdown stage — after all, you can't “ungate” a sound after the fact.
A good way to treat the problem at the source is by walling off the sound, either with thick blankets draped around the drum and mic (which also attenuates the loudness of the drum somewhat; see Fig. 4) or through some kind of tunnel that fits around the drum and channels the sound to the kick-drum mic. The tunnel approach is especially helpful because it lets you move the mic back from the drum, thus bolstering resonance (by allowing the bass waves to develop) while minimizing leakage from the rest of the kit.
One way to build a tunnel is by bending a fairly stiff rectangular piece of carpet into a semicircle and then fitting it around the drum, using tape, clothespins, or whatever to secure it in place. A quilt or thick blanket draped over the top of the carpet tunnel will provide even more isolation. Because the front of the tunnel remains open, any leakage that does get through to the other mics will sound relatively natural (as opposed to the more muffled sound that results from simply draping the drum and mic with a thick blanket).
My favorite thing to use for a tunnel is a Sonotube — one of those heavy cardboard tubes used as a form to pour cement into. They can be purchased from building-supply stores or lumberyards for $10 to $15 apiece. Diameters vary considerably. I have some 24-inch-diameter tubes in several lengths — 2, 4, and 8 feet. The 2- and 4-feet ones get the most use in my studio (see Fig. 5).
You can also use smaller-diameter tubes — an 8-inch-diameter PVC pipe, for example — to capture more unusual bass-drum sounds. This technique is most effective on double-headed-with-port kick drums. If possible, match the diameter of the tube to the diameter of the port. Position the tube flush with the head at the port and mic the drum at the other end of the port. This typically provides a whoosh sound and resonance from the pipe, which can sound really cool — or really bad, depending.
TWO-HEADED MONSTERThe late John Bonham had a penchant for oversize drums, but it wasn't the size of his drums alone that resulted in his typically monstrous kick-drum sound. A large component of Bonzo's sound came from the massive rooms the songs were tracked in — something to keep in mind if you're trying to get a similarly huge sound.
Still, a 24- or 26-inch kick with two heads, no port, and little or no muffling is going to make a big sound in almost any room. Like the open-tuned bop bass drum, it is usually better treated as part of the kit rather than as a separate instrument, meaning that you should get some distance between the drum and the microphone. Not only does that allow the low-frequency waveforms to develop, but it also helps avoid picking up any resonant “flub” from the movement of the resonant head. A high-quality large-diaphragm condenser microphone placed a couple of feet away from the kit and aimed toward the kick drum is probably your best bet. This positioning also allows for capture of room resonance — again, a critical part of the sound if you're after a huge Bonzo-type kick. Experiment with positioning to find just the right balance of direct drum sound and reflected room resonance.
Insufficient attack is a shortcoming that is not uncommon with this setup. In that case, try positioning a second mic — a Shure SM57 is a good pick — on the batter-head side of the kick with the capsule aimed at the point where the beater strikes the head. However, because this mic is aimed in the opposite direction of the large-diaphragm condenser out in front of the kick, the signals the two mics pick up will naturally be out of phase — around 180 degrees out, in fact. Conventional wisdom holds that it is therefore necessary to reverse the polarity on one of the mic channels. Though this is often the case, try all the possible permutations of polarity settings between the two channels — sometimes what should sound best in theory doesn't do so in practice. After determining which settings yield the best sound, the two signals can be mixed to one channel during tracking or, better yet, recorded to two separate tracks and blended together during mixdown.
MIXING IT UPUnless you are truly blessed, some EQ or other signal processing will often be required to make the kick-drum sound “fit” into the track. Although it is possible to process the sound before it hits your recorder, it's usually best to concentrate on capturing a clean representation of what is coming from the drum. On the other hand, occasionally a bizarre sound can inspire similar madness in all subsequent tracks — if that's where you want to go, by all means, print the processed track as is.
However, try to limit premix processing to minor EQ adjustments — after you've exhausted the possibilities for tonal improvement by way of drum positioning in the room, drum tuning, and mic selection and positioning, of course. Rather than boosting specific frequencies, try cutting. Usually, a cut in the 400 to 600 Hz region will remove tubbiness and make for a tighter, more powerful sound. If you aren't getting enough attack, try boosting somewhere between 2 and 5 kHz.
As for compression, the primary reason I compress a kick drum when tracking is to bring out the low-frequency ring and boom — components of the sound that happen after the initial transient. A good compressor can really bring out the resonance yet maintain or even enhance the desirable click from the beater. Note, however, that I record primarily to 2-inch tape. For those recording to digital media, it may be advisable to use a compressor or limiter also as a means to avert digital clipping.
In addition, noise gates can be effective for removing sounds (snare, hats, or whatever) that occur in the spaces between kick-drum hits. If the decay of the drum starts to sound odd, try using less than the maximum dynamic range the gate offers.
FINAL SAVESNo matter how carefully you record a kick drum, it's always possible to discover (usually after the drummer has packed up and gone home) that the kick is too thin sounding or just isn't working for the track. In the case of it sounding too thin, you can beef up the sound by means of a low-frequency oscillator used in conjunction with a noise gate that features a key input. To do this, first split (mult) the kick-drum signal and insert one signal into the noise gate's key input. Next, insert a low-frequency tone from a synthesizer or another oscillator into the gate's input. Experiment with the length of time that the gate stays open and the frequency of the tone. Long gate times will yield a booming, Roland 808-type kick. (By the way, the sound used by Roland in the 808 is actually a floor tom tuned way down.)
As a last resort, a drum module with trigger inputs can mean the difference between saving a track and rerecording it. Most models will have a gate and sensitivity control that allow the unit to reject unwanted sounds on the kick-drum track. If not, it may be necessary to insert a gate between the tape output and the drum module. Of course, for those working on computers, drum tracks can readily be replaced, either manually (one hit at a time) or with the help of automated software such as Digidesign's SoundReplacer for Pro Tools.
IT'S ALL RELATIVEWhen recording drums, keep in mind that most any drum will sound good if monitored loudly enough. Therefore, monitor at low levels, at least during the initial setup, to limit the “flatter effect” caused by sheer volume.
Another thing to be aware of is that your impression of the drum sound will change once the rest of the instruments are added to the mix. Thus, in addition to soloing the kick and other drum channels, make sure to audition the drums along with the other instruments. That way you can ensure that the sound is working for the song.
Richard Alan Salz is a producer, an engineer, and a composer living in southern Vermont.
This isn't “Gospel” by any stretch of the imagination, nor was I in any way an “inventor” of these techniques, merely a practitioner.
These techniques were pioneered
by the real “heroes/legends” of our industry,
guys like Glynn and Andy Johns, Geoff Emmerick, etc. Over
the years I managed to stumble across the techniques, and
in my own inept way have attempted to implement them.
The session talked about in this piece is from a record called
'Autobiotics' by the Boston band El Camino.
Since the original was written, I've also taken the liberty to
add a couple of things.
Enjoy (but take it all with a big grain of salt)....
How do you do this with the overheads ? Where should they be in
height, distance, aimed at? And are KM84 usually good tools for
the OH (overhead) pair? Will there be any polarity problems if I
throw in a snare and room mic?
There a half a dozen 'three mic drum techniques' that
I'm familiar with. Here are a few of them: I usually start with
a mic in front of the kit. It could be six feet or one foot off
the bass drum. The object of this mic is usually to get the 'front
of the kit.' I look for a good bass drum sound, but also the
bottom of the toms and a bit of snare. Cymbals will also exist here.
The tuning of the kit, the proficiency of the drummer, the mic selection
and placement are all pretty damn important. You can do a little
EQ to this, but not a whole hell of a lot. When you use equalizers
on this mic, you will find that you often mess up the balance of
the drums within the context of the kit. Depending on the tone you're
looking for, a ribbon, large diaphragm condenser or dynamic might
be the most appropriate.
For ribbons my choices are usually Royer 121's, RCA-77's...for large
diaphragm condensers, Neumann 47 FET's, M-147's; Soundelux U-195’s/U-95S’s and/or U-99’s; dynamics MD-421’s; AKG D-30's often work
pretty well, but they're a bitch to find and I don't own one. Sometimes
[rarely] a Shure SM57.
Now, in mono, one speaker, I put up a second mic. This can go anywhere
from directly over the snare to over the drummers right shoulder...or
anywhere in the arc in between. The key here is to add that mic
so you get the snare, hat, top of the toms and cymbals without the
cymbals being out of balance with the rest of the kit. If the drummer
can't control this balance, you're pretty much screwed and should
revert back to the close miked SR methods they teach at the recording
schools.
The reason I do this in mono - onespeaker is to insure that I'm
not going to mess with the bottom of the bass drum because of an
inconsistent phase relationship with the front mic. For this I will
often use a ribbon, like a Coles 4038, or a condenser. U-67's often
work. I find that as I get closer to 'behind the drummer', a small
diaphragm condenser, like a KM-54 will often work a bit better.
Mic number three is often placed next to the floor tom, just peeking
over the rim of the drum at the snare. It's usually placed equidistant
from the over mic as it relates to 'ground zero' [where the drummer
actually hits the snare drum, not the center of it]. As always,
one speaker mono is your friend.
Another set of fun ones...a pair of small diaphragm condensers [I
usually like an SM-2 Neumann for this] about 4-5 feet over the front
mic, aimed at the outer edges of the crash cymbals. I like an SM-2
because I have to worry about the phase relationships of the two
mics less, but still worry about that relationship as it relates
to the 'FOK' [front of the kit] mic.
Lately I’ve been using a Royer SF-12 in this application,
and absolutely loving it. Big , clear, open, not too brash, yet
no shortage of high end “silk”. Absolutely my first
choice these days.
There's another I've done where I use two lg. diaphragm condensers
[like 47's] and spread them out. Like one in front of each rack
tom [on the side of the toms. When I do this one, it seems that
if all three mics are equidistant from 'ground zero' my setup time
is pretty well reduced. Don't forget mono one speaker, or you may
end up wanting to drink Drano when it comes time to mix.
Adding room mics are often cool, it kinda depends on how you're
tracking. I hate musicians performing with headphones, so I like
to get everyone set up in the same area so they can hear themselves.
Like the old record said,”Let It Bleed”. The biggest
problem with doing this is the bottom of the bass bleeding into
the FOK mic and causing the bottom of the bass to get really smeary
sounding. You may have to move the bass amp around for a while until
you can get clear audio and the drummer can still hear and lock
up with the bass player.
Sometimes a small speaker like a 10- or 12-inch done as a satellite
speaker, placed in the null of the pickup pattern of the mics will
work wonders getting the drummer to lock with the bass player while
you move the bass amp farther away from the drum kit. Gobos will
often come in pretty handy too.
I find I get a lot of my guitar reverb/ambience, at least on the
basic track, by moving the guitar amp so the little bit of bleed
in the drum mics makes it a cool ambience for the guitars but doesn't
overpower the drum kit.
You will be surprised (I know I was) the first few times you do
these tricks how little bleed there actually is between instruments.
If there are two guitar players, I recommend setting them up on
opposite sides of the kit, that way you'll get a better stereo picture
when you disengage the mono button.
So, room mics. Now that you have the whole band set up in a room,
it’s time to mic the room. You should get a reasonable balance
of all the instruments, and it should sound like a band in a room
(fancy that!!) The mono button is still in until you're positive
that you're not totally fucking up the clarity of the bottom of
the track.
Need more snare you think (first of all, if you really do, the drummers
a pussy and should learn how to hit the things). But in those applications,
a Shure SM57 aimed about a foot off the side of the center of the
shell of the snare drum usually will add all you need without complicating
the rest of the balance.
A few other notes...First, the drummer *must* be competent...Second,
the kit should sound good, and be well tuned or you're screwed.
There will be damn little EQ that can be applied to any of this
without totally screwing up the whole picture, so it's gotta be
right the first time.
You will also find that a large room, or at least a room with a
high ceiling. comes in damn handy or this can start to sound boxy
in a hurry. I usually try to get soft things around the drum kit.
Front gobos as needed, usually just a gobo between the amps and
the kit will work pretty well at helping you control the bleed.
This usually alleviates the bounce and splatter that will be caused
by reflections off of hard walls. Depending on where you position
the kit, these reflections (especially on the cymbals) will come
back to haunt you as 'Haas Effect' stuff.
There are times when your artist is going to need to play loud.
Often, this means that the other players won't be able to hear the
drummer when they're playing. This is when you really need a great
big room, because you go to the old phone book/Rolodex and call
the local SR company.
Now, mic the kit as if it were a barroom, with those mics only going
to the SR speakers, the mics to the tape are still the original
mics you set up earlier. You can run the SR mics to the tape if
you want. Most times I don't have enough desk to bother, sometimes
I'll just take an extra stereo feed off the SR desk, thought I find
it's the first stuff to go if I run out of overdub tracks, or perhaps
I'll add a little in and do a drum bounce if I need more tracks...
Last one I did like this, we used 4 by EAW KF-852T & BH-852's
a side (about enough system to do a 1,500 seater with some headroom).
I also use this system if you're having the band play to loops.
For larger acts that are already using 'in-ear' monitor
stuff...you can bring their monitor engineer along to set this kind
of thing up (saves you beau coup hassle), but rather than treating
it like a headphone system (which it actually is), I still try to
maintain 'gig'/stage levels.
If you don't need to get loud, then the musicians will usually balance
themselves. Scratch vocal? Yeah, sometimes they are needed, aren't
they? Well, if you're using an SR system, that's where it goes,
if you have the 'ear monitor' option, a little in there too. If
they're playing relatively quietly, like they don't need any of
the SR stuff...often the singer can just belt it out over the band,
other times a little guitar amp on a stool will work nicely (The
mic being a handheld. Record it just for giggles, sometimes you
even get on the bonus plan and get a performance).
At times, a floor monitor (like at a bar gig) will work well. Make
sure you can EQ the monitor so the little bit of bleed you get from
the scratch vocal track can be used as a vocal reverb when it's
time to mix. Sometimes it's a way, way cool thing to have the reverb
of the scratch track be the main vocal reverb. Not only are there
always performance variations, but if you're trying to place the
singer in the same room with the band. It works like a charm. Just
like the guitar and bass amps - you may need to move it around for
balance.
Most of the time the singer will actually gravitate to the spot
in the room where the band's balance is best. Sometimes using a
stereo mic like an SM-69 (or on the last one I just did.. Guysonic's
Mr. Liteguy stereo head at that spot works like a dream. With Mr.
Liteguy, we got a doo-rag on him, a pair of shades and a cigarette
hanging out of his mouth pretty quickly. We called him 'Curtis'...that
way everyone pretty much forgot he was hangin' around...he was just
another dude on the venue, and one who didn't cut in front of you
on the dinner line - most excellent of him.
Tracking my basics like this I find I use fewer effect overall.
The overdubs require fewer effects, and the overall outcome is usually
'larger' sounding than when I do use a bunch of effect. The downside
is that you have less control over the individual tones. You can't
really do a lot of 'muscling it around' engineering.
I know a lot of brothers feel it's their God-given purpose in life
to move a whole load of knobs and stuff, so these methods will often
cause a whole bunch of stress as knobs become less involved in the
process, but you can use compressors to really make the whole thing
come alive. So there are some knobs that can be turned.
Other problems: if you're working with shitty musicians, there is
a bit less you can do to obscure the fact that they suck. Fixing
individual mistakes in the basics becomes more difficult depending
on the level of separation achieved, and how bad the clam is. This
mostly applies to bass players, but depending on how much guitar
is in the drum mics...and again, how bad the clam is… It can
be a bitch. This, from my experience, happens rarely.
I've also found that more often than not when someone makes a clam,
it drags down the groove for a bar or two. If they're performing
to a loop, then you can often cut in that section from another performance.
If the drummer/band is really tight, they might have even done multiple
performances at the same tempo. Cutting takes together, I guess
is kind of an old school thing.
I still work analog, so this is relatively easy to accomplish in
my world...it's probably pretty workable if you're working to hard
disk as well...but might, as in probably, will be a bitch and a
half to deal with if you're using VCR's.
Good luck...oh yeah...don't get discouraged...the first half dozen
or so times you goof with this stuff, it gets really overwhelming.
Practice on stuff that really doesn't matter that much. The first
time I gave myself over to 3 mics on the drums, I was up all night
the night before sweating it, puked before I left the house, and
wasn't sure if I wanted to continue with the program all the way
into the second day of the session.
Once I got past the anxiety and the “everything I know is
wrong” phase of the mental part...it started to get easier.
At this point I doubt I'll ever go back to the 'too many mics'
thing...but it took a while to get there. Another bonus...last project
I recorded, I had three full setups, three drum kits, three guitar
rigs, three bass rigs all set up in different environments, all
coming up on a 40 input desk.
All three setups were bussed to identical tracks, and I used the
automation grouping to select which environment I was going to record.
We had the 'Mainstage' (the one with the big PA) as group
one, the 'Memphis Room' (small amplifiers in a smaller,
walled off dead area) as group two, and the 'Iggy Room'
( Big-assed room what was finished in barnboard with hard floors
and a high ceiling. We called it the Iggy Room because the tone
of the room reminded me of 'Lust for Life').
We also fed the loops off the main recording console to each of
the environments where they were required. There were a couple of
songs where I had 'turn off the loop' cues. These were
either in like one bar breaks within the song, or to let the band
take the out of the song without the loop keeping time.
Being terminally lazy, muting the loops from the control room became
much easier. Now, another consideration, because there were no headphones
involved. I was monitoring the band off the machine in repro - when
I had a mute cue, I had to return the deck to 'input' or I'd be
tardy on the cue. Because the band wasn't monitoring off the deck,
I could switch back and forth at my leisure. We used the 'loop
send lines' if the musician needed to monitor the track to
do a fix punch.
We could try any of the songs in any of the environments simply
by selecting them with the automation group masters, and moving
the musicians to that room and having them play. I think it made
the record pretty interesting and diverse sounding, it also seemed
to aid in getting some pretty bitchin' performances from the musicians.
Which, after all is said and done, is what this sport is really
all about.
Part 1: Intro / Mic Choices / Shure SM57 / Sennheiser MD421U
What makes a great guitar recording? Start with a good player, the right amp, and a sweet sounding axe. Engineers can work magic with less, but it's unrealistic to expect a great track from a lame sounding amp, guitar, or performance. But let’s assume that the goods are coming from the speakers. To get that magic on tape (or disk), the recording engineer must combine his knowledge of guitars and amplifiers with an understanding of microphones and miking techniques. The ideal sound is the one that best fits the guitar part, the song, and the genre of production. While there are many excellent options for direct recording available today, we’re interested here in the time-honored tradition of miking up amplifiers.
Choosing and positioning microphones are crucial steps in shaping and capturing a guitar sound. The wrong mic, or even the right mic in the wrong place, can sabotage even the best sounding amp. Conversely, you can use mic placement to enhance the best qualities of an amp's sound. And while there are no hard and fast rules -- you'll need to use your ears to decide what's working -- we can tell you where to begin.
Choosing a Microphone
Microphone choice is as big a part of the guitar sound as any other factor: Mic type will greatly influence the player's tone and, by extension, the performance. There are almost as many mics and setups to choose from as there are amps and guitars. Let’s take a look at some favorites.
The Trusty SM57
The Shure SM57 cardioid dynamic is the most common microphone used to record electric guitar. This started back when all the more expensive microphones had already been used in big tracking sessions. Engineers were left with the lowly Shure to handle those loud, cranky, noisy guitar amps. Fortunately, it turned out that the SM57 was perfect for the task; its frequency response, originally tailored for speaking, matches the mid-range 'voice' qualities of the guitar. The SM57 also has a compression effect on loud sounds; it squashes nicely, facilitating the engineer's job of maintaining consistent recording levels.
You'll see engineers push a SM57 right into the grill cloth of an amp cabinet, taking advantage of the proximity effect, which boosts low frequencies when the mic is placed close to a sound source. The SM57 locks in a certain 'size' for the electric guitar, maintaining its appropriate place in the mix without additional EQ or compression.
Sennheiser's MD421U
The Sennheiser MD421U cardioid dynamic is also popular. It offers a wider frequency response (more high and low frequencies) than the SM57. A five-position rotary switch adjusts the frequency response from the flat position, called M (for music), all the way to the contoured S (for speech). Generally, I find the 421 brighter with less of the compression effect than the SM57. These mics are also more directional than the Shure, which is important for isolating the sound coming from one speaker in a multi-speaker cabinet.
Part 2: Condensers / Royer R-121 Ribbon
Condenser Microphones
Dynamic mics may be the most common choice for electric guitar recording, but condensers also work great. Just be careful not to get an overly bright sound. I often place a condenser mic further away from the speakers to capture a cabinet sound.
Figure 1 shows a Shure KSM44 condenser about 20" from a 1960's-vintage Marshall 4x10 cab. (I was auditioning the three cabinets in the picture.) With this setup, the guitarist might complain that his amp sounds brighter than usual, especially compared to a SM57, and feel he must readjust his amp's settings.
Fig. 1: Cabinet Miking
Condensers also pick up more low frequencies from the amp than dynamic mics. This may or may not be a good thing; pushing a lot of air might work in a heavy metal track, but can be inappropriate for a lighter pop song. Certain condensers can overload when close-miking extremely loud amps. Occasionally, the mic's metal windscreen can get loose and vibrate. Always use the attenuator pad and, if necessary, the low frequency roll-off. The Neumann U-87 and U-47FET, Shure KSM44 or the Audio-Technica AT-4041 are all good choices.
Many condenser mics also offer an opportunity to experiment with different polar patterns, such as omni-directional and figure-8. Omni mics differ from cardioids in that they do not exhibit proximity effect. Omnis, which receive signal from all around the capsule, pick up more of the total sound of the amp and room tone (as opposed to the cardioid sound, which focuses on the source in front of it). This makes the omni pattern a good choice for ambient guitar sounds and, when used in a multi-mic setup, as room mics. Figure-of-Eight mics also pick up more of the room than cardioid mics, receiving signal at the front and back of the capsule.
Royer R-121 Ribbon Microphone
Speaking of figure-8 mics, my new favorite for guitar is the ribbon microphone. I have a pair of Royer R-121 figure-8 microphones that offer a whole new range of warm electric guitar sounds. Big, cumbersome ribbon mics have been around for years, but these fragile units were notoriously prone to damage when used on loud instruments. The lighter and smaller Royers can handle huge volumes without the worry.
Like other figure-8 mics, the Royer picks up sound from two opposing sides in what is also called a bi-directional pattern, and you can take advantage of this to get more of the recording space or room in the sound. (Experts note: The sound entering the rear of the mic is 180 degrees out-of-phase with that coming into the front.)
When A/B'ing the Royer against the SM57, one engineer remarked to me, 'When you switch from the Royer back to the 57, you wonder where half the guitar sound went.' While a big, fat, and warm guitar sound like the one described here might sound ideal on its own, make sure it fits your mix before you commit to it.
Part 3: Mic Placement Options
Mic Placement
Miked from the Front
Figure 2 shows an SM57 pointed at a very rare '60s Gibson recording amp. I aimed the microphone exactly at the center of the speaker driver inside the amp. (For those who don't know this amp, this amp’s speaker is not mounted in the exact center of the cabinet. For the sake of this example, though, we’re positioning the mic as if the speaker sits dead center --Ed.) You can shine a flashlight through the grille cloth to help you find the speaker.
Fig. 2: Straight-on Miking
The position pictured produces the most high frequencies. Moving the mic closer increases level and low frequencies (remember proximity effect?) and reduces the cabinet's contribution to the overall sound. There is a whole group of guitarists and engineers who claim that there's nothing worth recording from the exact center of a speaker. While this may be true of some speakers, you should test this position and judge for yourself.
If you want fewer highs and more warmth, move the mic sideways, parallel to the floor, toward the outside of the speaker. You should move in one-inch increments with someone you trust listening in the control room. With a mic inches from the speaker cone, small increments make a big difference.
Fig. 3 shows an SM57 at a slight angle on a Fender brown-face Deluxe. Usually, this position offers ample highs and more tonality than the straight-on position. Try it from both sides of the speaker, and from the top or bottom. If the mic ends up on the floor pointed at the speaker, and sounds good, nail it down! The floor can trap bass frequencies and enhance tone, especially if it is wooden and built on a raised foundation.
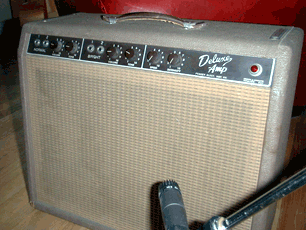
Fig. 3: Angled Miking
If the floor seems to 'close down' the sound, try tilting the amp back. Fenders have chrome legs on the sides of the cabinets for that purpose, and VOX amplifiers, like the AC30 and Super Beatle models, came with tilting carriage stands that completely isolated the amplifier from the floor. If possible, I like to set the amp on a folding chair in the studio.
Figure 4 shows an MD421U on a vintage Fender Tweed Deluxe. I've tilted the amp back so that the bottom of the cabinet couples less with the floor. All of these amps are open-backed; walls (or open spaces) directly behind them greatly affect bass response.
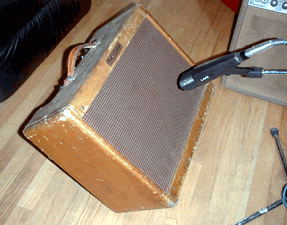
Fig. 4: Tilted-back Miking
Front and Back
Figure 5 shows an open-backed amp (the Matchless DC30) with an SM57 on the rear and a KSM44 on the front. This setup produces a very unusual tone. You can mix the two mics for a mono track, or route them to separate left and right tracks in your mix. Try moving the mics very close to the speakers and processing the rear mic through a very short delay of less than 3ms. You may also want to flip the phase of one of the mics to test which position sounds best.
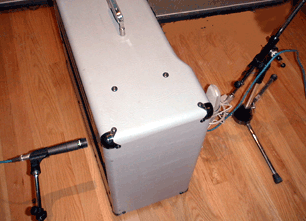
Fig. 5: Front and Back Miking
Multiple Miking
More complex multiple miking techniques can yield great results, but demand even greater care. Multiple miking is a good way find out which speaker sounds the best in a 4x10 cab, and also offers the option of recording each speaker to its own track. Be careful with phase, as some speaker manufacturers deliberately wire multi-speaker cabinets in and out of phase. Some engineers will use a condenser on one speaker and a dynamic or ribbon on another. I like to find the best speaker and use two mics on the same speaker. Even then, I sometimes hear a little 'phasiness' between the microphones. A very popular setup is an SM57 up close with a U-87 or the tube U-67 for a cabinet mic four or five feet away.
In the Middle
In Figure 6, I used a Royer R-121 equidistant between a ’60s 4x10 Marshall straight cabinet and a reissue 4x10 slant cabinet, both driven by a single amplifier. This setup won't work unless one of the cabinet's speaker cables is wired out of phase or unless the cabinets are wired out of phase with one another. With both speaker cabinets pushing and pulling together -- and the warm sound of the ribbon in the middle -- you won't find a fatter tone, especially for clean sounds.
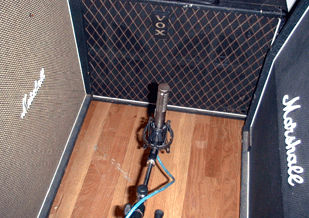
Fig. 6: In-the-middle Miking
Part 4: A Scientific Approach / Other Methods
Scientific Starting Point

Fig. 7: Scientific Approach
To find this position, you must measure the output level of a microphone while you move it around in front of the amp. First, set up for a guitar overdub with your microphone and fix the headphones so the musician can hear himself. Next, unplug all headphones and send a steady 700Hz oscillator tone into the guitar amp's input jack. Place a large VU meter so that you can see it from wherever the guitar speaker cabinet or combo amp is located. (If you can't get a sight line to the VU, plug a volt meter into the cue system and read the level there). Set the meter to read mid-scale with the cue system level control. And wear ear protectors! Let's make this science project as painless as possible.
Move the microphone around in front of the amp. In doing this, you'll find many peaks and dips in level. I try to stand behind the speaker so that my body doesn't affect this measurement process. Obviously, the level goes up as the mic gets closer to the speaker, but if you keep a fixed distance and then move the mic left, right, up or down, you'll find a peak level. This is where you should set the mic. Make sure you like the sound you get using the scientific starting point -- you may hate it!
Other Methods
These are some other ways to accomplish the task of recording guitar amps. Whether used alone or in combination with the aforementioned, all require much more experimentation and studio time.
Room Mics
When placed in a great sounding space, room mics are an easy way to dress up a boring guitar sound. And there's a lot of room (pardon the pun) to experiment. Try different distances and heights, microphone types, EQ, compression and delay. I sometimes tape pressure zone microphones to the control room glass, or leave the studio doors open or put a mic down a hallway. If you have an elevator shaft or stairwell handy, try putting the amp at the bottom and a mic at the top.
Recording The Electric Acoustically
Figure 8 shows a Sennheiser e865 handheld condenser miking the 'holy grail' of electric guitars: the 1959 Les Paul Sunburst. Obviously, you will have to put the amp in another room for this to work. But I have recorded amps and mics on separate tracks and it makes a very unique combo. Great for arpeggios!
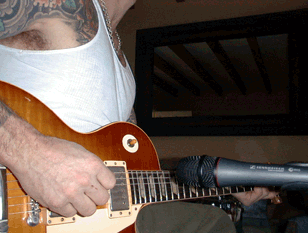
Fig. 8: Recording the Electric Acoustically
But wait... there's more
The microphone is a great tool for recording guitars, but it's not the only one available. We'll dig deeper into direct recording – recording the guitar without microphones --
in an upcoming piece.
Images courtesy of the Oliver Leiber Collection.
Barry Rudolph is an L.A.-based recording engineer. Visit his Web site at www.barryrudolph.com.
©copyright 2000 by Barry Rudolph
When you apply a lot of EQ (6dB or more), you may hear some consequences on the output. Here are a few common side effects to applying a lot of equalization and some ways to avoid them.
Distortion
If you boost the low frequencies enough, you will distort the output.
You can verify this by watching the output meter peak into the red
CLIP range. To avoid this, trim down the OUTPUT knob. Better yet, try
cutting the highs instead of boosting the low frequencies.
Noise
If you boost the high frequencies enough you may hear noise in your
system that was otherwise not audible. If this is objectionable, you
may want to gate that channel when it isn’t being used or automate
the console so that channel is muted when that instrument isn’t
playing.
Phasing
If you apply a lot of EQ, more than 12dB on several bands, you may
hear some phase distortion. This is just the nature of EQ –the more
you cut or boost, the more phase distortion will occur. Try getting
the same effect with less EQ, try cutting instead of boosting, or try
moving the microphone to achieve the effect you’re looking for.
Tip: When possible, always try cutting before boosting. Instruments usually sound better when you cut the problem frequencies instead of boosting the frequencies you want to feature.
(taken out of the Alesis PEQ-450 manual (p. 32))
This section is designed to get you started [...] by giving some sample settings. These are merely suggested settings, experiment and find your own [...].
In a way, it’s absurd to suggest EQ settings without knowing what the source sounds like. EQ is a tool that’s used to change the timbre of a sound, and it’s impossible to suggest an EQ setting that, for example, will make all guitars sound better. So the goal of this section is to give you some ideas for using EQ on your own tracks.
Rock Kick Drum
A rock and roll kick drum is usually EQed quite a bit to make it
sound the way it does on the radio. Usually an engineer will choose
to cut some of the woofy low-midrange, while boosting the high-end
'slap' and maybe even some of the lows. Here is a setting to try on a
close-miked kick drum:
Vocal Air
A popular effect on vocals is to boost the high frequencies to add
'air' to the vocal. This is an especially popular effect on ballads sung
by R&B divas. This effect is achieved by boosting the high
frequencies.
Hum Removal
You may need to use a recorded performance with ground hum
present on the track. This hum can be decreased or even eliminated
using EQ:
Tip: To find the exact frequency where hum is present, set the EQ band to a narrow Q, boost that band, then sweep the frequency control up and down until you hear the hum. When you’ve found the frequency, cut it as much as you can.
Tape hiss removal
If a recording has a lot of tape hiss, such as one transferred from
cassette, you can usually get rid of it using a bit of high shelving EQ.
Eliminating feedback
During a live performance, you may experience feedback if a
monitor is reproducing a microphone placed too close to that
monitor. However, this feedback often occurs at one frequency
before it happens at others. You can 'ring out' the monitor by using
EQ to cut the frequency that’s feeding back. This is best to try when
there is not a band and audience present:
(taken out of the Alesis PEQ-450 manual (p. 33-5))